快照测试
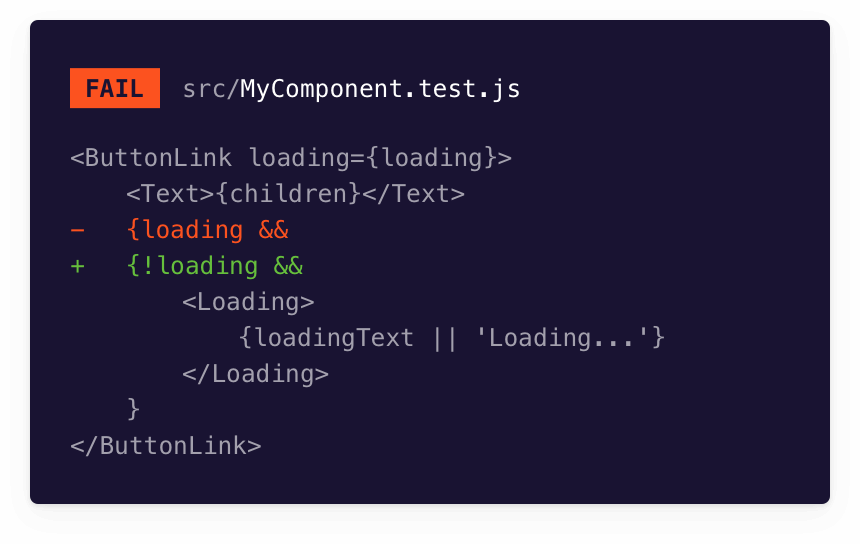
快照测试将每个 Story 渲染的标记与已知的基线进行比较。这是一种识别触发渲染错误和警告的标记更改的方法。
Storybook 是一个用于快照测试的有用工具,因为每个 Story 本质上都是一个测试规范。每当您编写或更新一个 Story 时,您都可以免费获得一个快照测试。

使用 test-runner 自动化快照测试
Storybook test-runner 将您的所有 Story 转换为可执行的测试。由 Jest 和 Playwright 驱动。它是一个独立的、与框架无关的实用程序,与您的 Storybook 并行运行。它使您能够在多浏览器环境中运行多种测试模式,包括使用Play 函数、DOM 快照和可访问性测试的组件测试。
设置
要使用 test-runner 启用快照测试,您需要采取额外的步骤来正确设置它。我们建议您在继续进行其余所需配置之前,先阅读test-runner 文档,以了解有关可用选项和 API 的更多信息。
在您的 Storybook 目录中添加一个新的配置文件,内容如下
import type { TestRunnerConfig } from '@storybook/test-runner';

const config: TestRunnerConfig = {
  async postVisit(page, context) {
    // the #storybook-root element wraps the story. In Storybook 6.x, the selector is #root
    const elementHandler = await page.$('#storybook-root');
    const innerHTML = await elementHandler.innerHTML();
    expect(innerHTML).toMatchSnapshot();
  },
};

export default config;postVisit 钩子允许您扩展测试运行器的默认配置。在此处了解更多。
当您执行测试运行器(例如,使用 yarn test-storybook)时,它将遍历您的所有 Story 并运行快照测试,为您的项目中位于 __snapshots__ 目录中的每个 Story 生成一个快照文件。
配置
开箱即用,test-runner 提供了内置的快照测试配置,涵盖了大多数用例。您还可以通过 test-storybook --eject 或在项目根目录中创建 test-runner-jest.config.js 文件来微调配置以满足您的需求。
覆盖默认快照目录
默认情况下,test-runner 对生成的快照文件使用特定的命名约定和路径。如果您需要自定义快照目录,您可以定义自定义快照解析器来指定快照的存储目录。
创建一个 snapshot-resolver.js 文件来实现自定义快照解析器
import path from 'path';

export default {
  resolveSnapshotPath: (testPath) => {
    const fileName = path.basename(testPath);
    const fileNameWithoutExtension = fileName.replace(/\.[^/.]+$/, '');
    // Defines the file extension for the snapshot file
    const modifiedFileName = `${fileNameWithoutExtension}.snap`;

    // Configure Jest to generate snapshot files using the following convention (./src/test/__snapshots__/Button.stories.snap)
    return path.join('./src/test/__snapshots__', modifiedFileName);
  },
  resolveTestPath: (snapshotFilePath, snapshotExtension) =>
    path.basename(snapshotFilePath, snapshotExtension),
  testPathForConsistencyCheck: 'example',
};
更新 test-runner-jest.config.js 文件并启用 snapshotResolver 选项以使用自定义快照解析器
import { getJestConfig } from '@storybook/test-runner';

const defaultConfig = getJestConfig();

const config = {
  // The default Jest configuration comes from @storybook/test-runner
  ...defaultConfig,
  snapshotResolver: './snapshot-resolver.js',
};

export default config;
当测试运行器执行时,它将循环遍历您的所有 Story 并运行快照测试,为您的项目中位于您指定的自定义目录中的每个 Story 生成一个快照文件。
自定义快照序列化
默认情况下,test-runner 使用 jest-serializer-html 来序列化 HTML 快照。如果您使用特定的 CSS-in-JS 库(如 Emotion、Angular 的 ng 属性)或类似的为 CSS 类生成基于哈希的标识符的库,则可能会导致问题。如果您需要自定义快照的序列化,您可以定义自定义快照序列化器来指定如何序列化快照。
创建一个 snapshot-serializer.js 文件来实现自定义快照序列化器
// The jest-serializer-html package is available as a dependency of the test-runner
const jestSerializerHtml = require('jest-serializer-html');

const DYNAMIC_ID_PATTERN = /"react-aria-\d+(\.\d+)?"/g;

module.exports = {
  /*
   * The test-runner calls the serialize function when the test reaches the expect(SomeHTMLElement).toMatchSnapshot().
   * It will replace all dynamic IDs with a static ID so that the snapshot is consistent.
   * For instance, from <label id="react-aria970235672-:rl:" for="react-aria970235672-:rk:">Favorite color</label> to <label id="react-mocked_id" for="react-mocked_id">Favorite color</label>
   */
  serialize(val) {
    const withFixedIds = val.replace(DYNAMIC_ID_PATTERN, 'mocked_id');
    return jestSerializerHtml.print(withFixedIds);
  },
  test(val) {
    return jestSerializerHtml.test(val);
  },
};
更新 test-runner-jest.config.js 文件并启用 snapshotSerializers 选项以使用自定义快照解析器
import { getJestConfig } from '@storybook/test-runner';

const defaultConfig = getJestConfig();

const config = {
  ...defaultConfig,
  snapshotSerializers: [
    // Sets up the custom serializer to preprocess the HTML before it's passed onto the test-runner
    './snapshot-serializer.js',
    ...defaultConfig.snapshotSerializers,
  ],
};

export default config;
当测试运行器执行您的测试时,它将检查生成的 HTML,将动态生成的属性替换为自定义序列化器文件中正则表达式提供的静态属性,然后再对组件进行快照。这确保了快照在不同的测试运行中保持一致。
使用可移植 Stories 进行快照测试
Storybook 提供了一个 composeStories 实用程序,可帮助将测试文件中的 Story 转换为可在 JSDOM 的 Node 测试中重用的可渲染元素。它还允许您将您在项目中启用的其他 Storybook 功能(例如,装饰器、args)应用于您的测试中,使您能够在您选择的测试环境(例如,Jest、Vitest)中重用您的 Story,确保您的测试始终与您的 Story 同步,而无需重写它们。这就是我们在 Storybook 中所说的可移植 Story。
您必须配置您的测试环境以使用可移植 Story,以确保您的 Story 与您的 Storybook 配置的所有方面(例如装饰器)组合在一起。
在单个 Story 上运行测试
如果您需要在单个 Story 上运行测试,您可以使用来自相应框架的 composeStories 函数来处理它,并应用您在 Story 中定义的任何配置(例如,装饰器、args),并将其与您的测试环境结合起来以生成快照文件。例如,如果您正在处理一个组件,并且想要测试其默认状态,确保预期的 DOM 结构没有更改,那么您可以这样编写测试
import { composeStories } from '@storybook/react';

import * as stories from '../stories/Button.stories';

const { Primary } = composeStories(stories);
test('Button snapshot', async () => {
  await Primary.run();
  expect(document.body.firstChild).toMatchSnapshot();
});
在多个 Story 上执行测试
您还可以使用 composeStories 函数来测试多个 Story。当您想要扩展测试覆盖率以生成项目中组件不同状态的快照时,这非常有用。为此,您可以编写如下测试
// Replace your-framework with one of the supported Storybook frameworks (react, vue3)
import type { Meta, StoryFn } from '@storybook/your-framework';

import path from 'path';
import * as glob from 'glob';

import { describe, test, expect } from '@jest/globals';

// Replace your-renderer with the renderer you are using (e.g., react, vue3, svelte, etc.)
import { composeStories } from '@storybook/your-renderer';

type StoryFile = {
  default: Meta;
  [name: string]: StoryFn | Meta;
};

const compose = (entry: StoryFile): ReturnType<typeof composeStories<StoryFile>> => {
  try {
    return composeStories(entry);
  } catch (e) {
    throw new Error(
      `There was an issue composing stories for the module: ${JSON.stringify(entry)}, ${e}`,
    );
  }
};

function getAllStoryFiles() {
  // Place the glob you want to match your stories files
  const storyFiles = glob.sync(
    path.join(__dirname, 'stories/**/*.{stories,story}.{js,jsx,mjs,ts,tsx}'),
  );

  return storyFiles.map((filePath) => {
    const storyFile = require(filePath);
    const storyDir = path.dirname(filePath);
    const componentName = path.basename(filePath).replace(/\.(stories|story)\.[^/.]+$/, '');

    return { filePath, storyFile, storyDir, componentName };
  });
}

describe('Stories Snapshots', () => {
  getAllStoryFiles().forEach(({ storyFile, componentName }) => {
    const meta = storyFile.default;
    const title = meta.title || componentName;

    describe(title, () => {
      const stories = Object.entries(compose(storyFile)).map(([name, story]) => ({ name, story }));

      if (stories.length <= 0) {
        throw new Error(
          `No stories found for this module: ${title}. Make sure there is at least one valid story for this module.`,
        );
      }

      stories.forEach(({ name, story }) => {
        test(name, async () => {
          await story.run();
          // Ensures a consistent snapshot by waiting for the component to render by adding a delay of 1 ms before taking the snapshot.
          await new Promise((resolve) => setTimeout(resolve, 1));
          expect(document.body.firstChild).toMatchSnapshot();
        });
      });
    });
  });
});
当您的测试在您的测试环境中执行时,它们将生成一个包含项目中所有 Story 的单个快照文件(即,storybook.test.ts|js.snap)。但是,如果需要,您可以扩展您的测试文件,以使用 Vitest 的 toMatchFileSnapshot API 或 Jest 的 jest-specific-snapshot 包为项目中的每个 Story 生成单独的快照文件。例如
// Replace your-framework with one of the supported Storybook frameworks (react, vue3)
import type { Meta, StoryFn } from '@storybook/your-framework';

import path from "path";
import * as glob from "glob";

//👇 Augment expect with jest-specific-snapshot
import "jest-specific-snapshot";

import { describe, test, expect } from "@jest/globals";

// Replace your-renderer with the renderer you are using (e.g., react, vue3, svelte, etc.)
import { composeStories } from '@storybook/your-renderer';

type StoryFile = {
  default: Meta;
  [name: string]: StoryFn | Meta;
};

const compose = (
  entry: StoryFile
): ReturnType<typeof composeStories<StoryFile>> => {
  try {
    return composeStories(entry);
  } catch (e) {
    throw new Error(
      `There was an issue composing stories for the module: ${JSON.stringify(entry)}, ${e}`
    );
  }
};

function getAllStoryFiles() {
  // Place the glob you want to match your stories files
  const storyFiles = glob.sync(
    path.join(__dirname, 'stories/**/*.{stories,story}.{js,jsx,mjs,ts,tsx}'),
  );

  return storyFiles.map((filePath) => {
    const storyFile = require(filePath);
    const storyDir = path.dirname(filePath);
    const componentName = path
      .basename(filePath)
      .replace(/\.(stories|story)\.[^/.]+$/, "");

    return { filePath, storyFile, storyDir, componentName };
  });
}

describe("Stories Snapshots", () => {
  getAllStoryFiles().forEach(({ storyFile, componentName }) => {
    const meta = storyFile.default;
    const title = meta.title || componentName;

    describe(title, () => {
      const stories = Object.entries(compose(storyFile)).map(
        ([name, story]) => ({ name, story })
      );

      if (stories.length <= 0) {
        throw new Error(
          `No stories found for this module: ${title}. Make sure there is at least one valid story for this module.`
        );
      }

      stories.forEach(({ name, story }) => {
        test(name, async () => {
          await story.run();
          // Ensures a consistent snapshot by waiting for the component to render by adding a delay of 1 ms before taking the snapshot.
          await new Promise((resolve) => setTimeout(resolve, 1));
          // Defines the custom snapshot path location and file name
          const customSnapshotPath = `./__snapshots__/${componentName}.test.ts.snap`;
          expect(document.body.firstChild).toMatchSpecificSnapshot(customSnapshotPath);
      });
    });
  });
});
快照测试和可视化测试之间有什么区别?
可视化测试捕获 Story 的图像并将其与图像基线进行比较。快照测试获取 DOM 快照并将其与 DOM 基线进行比较。可视化测试更适合于验证外观。快照测试对于冒烟测试和确保 DOM 不会更改非常有用。
