
交互测试
在 Storybook 中,交互测试是作为story的一部分构建的。该 story 会渲染具有必要 props 和 context 的组件,将其置于初始状态。然后,您可以使用play 函数来模拟用户行为,例如点击、输入和提交表单,然后断言最终结果。
您可以使用 Storybook UI 中的“交互”面板来预览和调试您的交互测试。它们可以通过 Vitest 插件自动化,允许您在 Storybook、终端或 CI 环境中运行项目的测试。
编写交互测试
您可以对编写的每个 story 进行渲染测试。渲染测试是交互测试的一个简化版本,它只测试组件在给定状态下成功渲染的能力。这对于像 Button 这样相对简单、静态的组件来说效果很好。但对于更复杂、更具交互性的组件,您可以做得更多。
您可以使用 play 函数来模拟用户行为并断言功能方面,例如 DOM 结构或函数调用。当测试组件时,play 函数将被运行,其中的任何断言都将被验证。
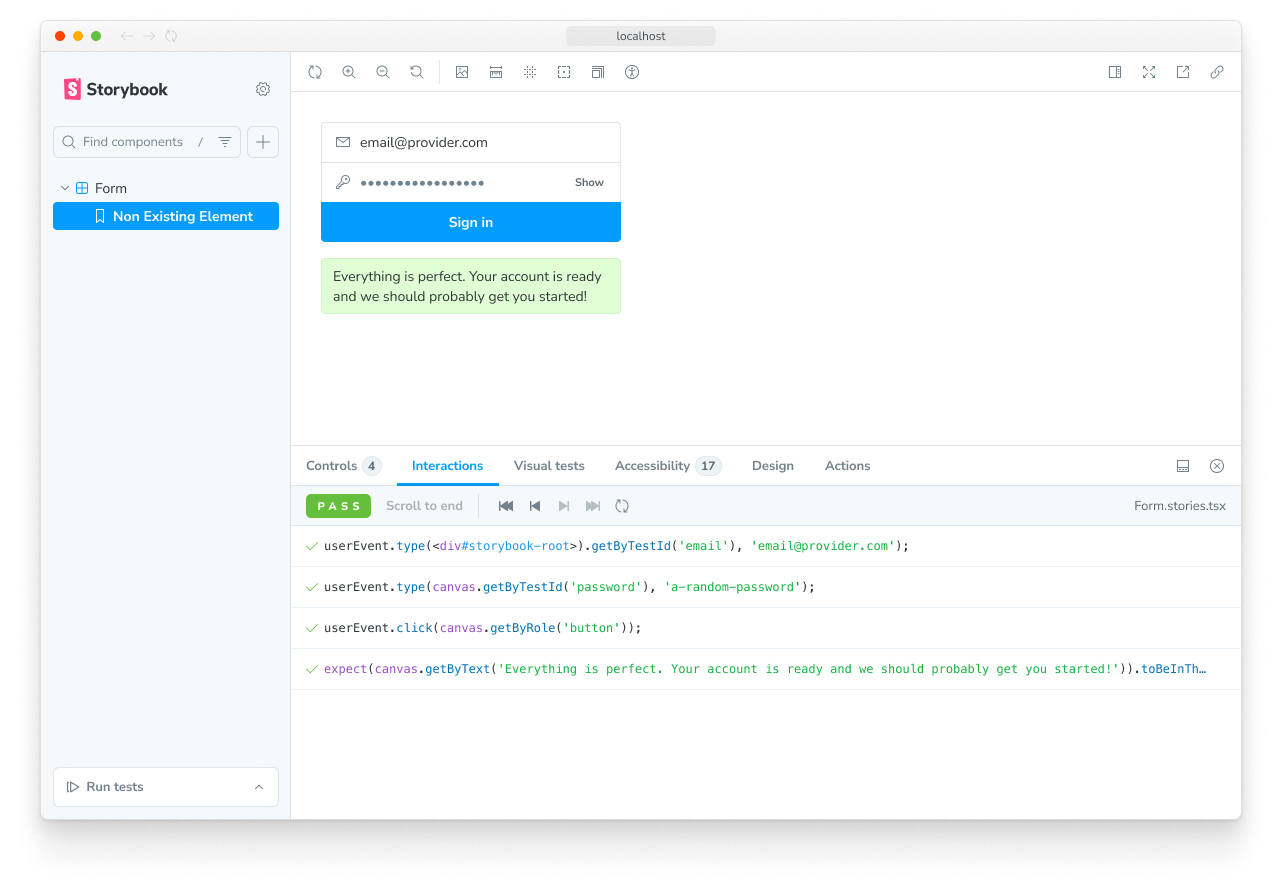
在此示例中,EmptyForm story 测试 LoginForm 组件的渲染,而 FilledForm story 测试表单提交
// Replace your-framework with the framework you are using, e.g. react-vite, nextjs, nextjs-vite, etc.
import type { Meta, StoryObj } from '@storybook/your-framework';

import { expect } from 'storybook/test';

import { LoginForm } from './LoginForm';

const meta = {
  component: LoginForm,
} satisfies Meta<typeof LoginForm>;
export default meta;

type Story = StoryObj<typeof meta>;

export const EmptyForm: Story = {};

export const FilledForm: Story = {
  play: async ({ canvas, userEvent }) => {
    // 👇 Simulate interactions with the component
    await userEvent.type(canvas.getByTestId('email'), 'email@provider.com');

    await userEvent.type(canvas.getByTestId('password'), 'a-random-password');

    // See https://storybook.org.cn/docs/essentials/actions#automatically-matching-args to learn how to setup logging in the Actions panel
    await userEvent.click(canvas.getByRole('button'));

    // 👇 Assert DOM structure
    await expect(
      canvas.getByText(
        'Everything is perfect. Your account is ready and we should probably get you started!',
      ),
    ).toBeInTheDocument();
  },
};
这个代码示例有很多内容,让我们逐一分析 API。
查询 canvas
canvas 是一个可查询的元素,其中包含正在测试的 story,它作为 play 函数的参数提供。您可以使用 canvas 来查找要与之交互或断言的特定元素。所有查询方法都直接来自 Testing Library,形式为 <type><subject>。
可用类型总结在此表中,并在Testing Library 文档中完整记录。
| 查询类型 | 0 匹配 | 1 匹配 | >1 匹配 | 等待 |
|---|---|---|---|---|
| 单个元素 | ||||
getBy... | 抛出错误 | 返回元素 | 抛出错误 | 否 |
queryBy... | 返回 null | 返回元素 | 抛出错误 | 否 |
findBy... | 抛出错误 | 返回元素 | 抛出错误 | 是 |
| 多个元素 | ||||
getAllBy... | 抛出错误 | 返回数组 | 返回数组 | 否 |
queryAllBy... | 返回 [] | 返回数组 | 返回数组 | 否 |
findAllBy... | 抛出错误 | 返回数组 | 返回数组 | 是 |
主体在此处列出,并链接到它们的完整 Testing Library 文档
ByRole— 按可访问性角色查找元素ByLabelText— 按关联的标签文本查找元素ByPlaceholderText— 按占位符值查找元素ByText— 按它们包含的文本查找元素ByDisplayValue— 按当前值查找input、textarea或select元素ByAltText— 按给定的alt属性值查找元素ByTitle— 按给定的title属性值查找元素ByTestId— 按给定的data-testid属性值查找元素
注意此列表的顺序!我们(以及Testing Library)强烈建议您按照真实用户与 UI 交互的方式来查询元素。例如,按可访问性角色查找元素有助于确保最多的人可以使用您的组件。而使用 data-testid 应作为最后的手段,仅在尝试了所有其他方法之后。
将这些内容结合起来,一些典型的查询可能如下所示:
// Find the first element with a role of button with the accessible name "Submit"
await canvas.findByRole('button', { name: 'Submit' });

// Get the first element with the text "An example heading"
canvas.getByText('An example heading');

// Get all elements with the role of listitem
canvas.getAllByRole('listitem');
使用 userEvent 模拟行为
在查询了元素之后,您可能需要与之交互来测试组件的行为。为此,我们使用 userEvent 工具,它作为 play 函数的参数提供。该实用程序模拟用户与组件的交互,例如单击按钮、在输入框中键入以及选择选项。
userEvent 上有许多可用方法,这些方法在user-event 文档中有详细介绍。此表将重点介绍一些常用方法。
| 方法 | 描述 |
|---|---|
click | 单击元素,调用 click() 函数await userEvent.click(<element>) |
dblClick | 双击元素await userEvent.dblClick(<element>) |
hover | 悬停在元素上await userEvent.hover(<element>) |
unhover | 取消悬停在元素上await userEvent.unhover(<element>) |
tab | 按下 Tab 键await userEvent.tab() |
type | 在输入框或文本区域中输入文本await userEvent.type(<element>, 'Some text'); |
keyboard | 模拟键盘事件await userEvent.keyboard('{Shift}'); |
selectOptions | 选择 select 元素指定的选项await userEvent.selectOptions(<element>, ['1','2']); |
deselectOptions | 取消选择 select 元素指定的选项await userEvent.deselectOptions(<element>, '1'); |
clear | 选择输入框或文本区域中的文本并删除await userEvent.clear(<element>); |
userEvent 方法必须在 play 函数内部 await。这确保它们可以在 Interactions 面板中正确记录和调试。
使用 expect 断言
最后,在查询了元素并模拟了行为之后,您可以对结果进行断言,这些结果在运行测试时会被验证。为此,我们使用 expect 工具,它可以通过 storybook/test 模块获得。
import { expect } from 'storybook/test';这里的 expect 工具结合了 Vitest 的 expect 和 @testing-library/jest-dom(尽管名字如此,但它在 Vitest 测试中也有效)中可用的方法。有很多很多方法可用。此表将重点介绍一些常用方法。
| 方法 | 描述 |
|---|---|
toBeInTheDocument() | 检查元素是否在 DOM 中await expect(<element>).toBeInTheDocument() |
toBeVisible() | 检查元素是否对用户可见await expect(<element>).toBeVisible() |
toBeDisabled() | 检查元素是否被禁用await expect(<element>).toBeDisabled() |
toHaveBeenCalled() | 检查是否调用了监视的函数await expect(<function-spy>).toHaveBeenCalled() |
toHaveBeenCalledWith() | 检查是否使用了特定参数调用了监视的函数await expect(<function-spy>).toHaveBeenCalledWith('example') |
expect 调用必须在 play 函数内部 await。这确保了它们可以在 Interactions 面板中正确记录和调试。
使用 fn 监视函数
当您的组件调用函数时,您可以使用 Vitest 提供的 fn 工具来监视该函数,以断言其行为。该工具可以通过 storybook/test 模块获得。
import { fn } from 'storybook/test'大多数时候,您会在编写 story 时将 fn 用作 arg 值,然后在测试中访问该 arg。
// Replace your-framework with the name of your framework (e.g. react-vite, vue3-vite, etc.)
import type { Meta, StoryObj } from '@storybook/your-framework';
import { fn, expect } from 'storybook/test';

import { LoginForm } from './LoginForm';

const meta = {
  component: LoginForm,
  args: {
    // 👇 Use `fn` to spy on the onSubmit arg
    onSubmit: fn(),
  },
} satisfies Meta<typeof LoginForm>;
export default meta;

type Story = StoryObj<typeof meta>;

export const FilledForm: Story = {
  play: async ({ args, canvas, userEvent }) => {
    await userEvent.type(canvas.getByLabelText('Email'), 'email@provider.com');
    await userEvent.type(canvas.getByLabelText('Password'), 'a-random-password');
    await userEvent.click(canvas.getByRole('button', { name: 'Log in' }));

    // 👇 Now we can assert that the onSubmit arg was called
    await expect(args.onSubmit).toHaveBeenCalled();
  },
};
在组件渲染之前运行代码
您可以使用 play 方法中的 mount 函数在渲染组件之前执行代码。
这是一个使用 mockdate 包模拟 Date 的示例,这是使您的 story 渲染为一致状态的有用方法。
import MockDate from 'mockdate';

// ...rest of story file

export const ChristmasUI: Story = {
  async play({ mount }) {
    MockDate.set('2024-12-25');
    // 👇 Render the component with the mocked date
    await mount();
    // ...rest of test
  },
};使用 mount 函数有两个要求:
- 您必须从
context(传递给 play 函数的参数)中解构出 mount 属性。这可以确保 Storybook 在 play 函数开始之前不会开始渲染 story。 - 您的 Storybook 框架或构建器必须配置为转译到 ES2017 或更高版本。这是因为解构语句和 async/await 用法会被否则转译掉,这会阻止 Storybook 识别您对
mount的使用。
在渲染前创建模拟数据
您还可以使用 mount 来创建要传递给组件的模拟数据。为此,首先在 play 函数中创建您的数据,然后调用带有已配置了该数据的组件的 mount 函数。在此示例中,我们创建了一个模拟的 note,并将其 id 传递给 Page 组件,然后我们用它来调用 mount。
// Replace your-framework with the framework you are using, e.g., react-vite, nextjs, nextjs-vite, etc.
import type { Meta, StoryObj } from '@storybook/your-framework';

// 👇 Automocked module resolves to '../lib/__mocks__/db'
import db from '../lib/db';
import { Page } from './Page';

const meta = { component: Page } satisfies Meta<typeof Page>;
export default meta;

type Story = StoryObj<typeof meta>;

export const Default: Story = {
  play: async ({ mount, args, userEvent }) => {
    const note = await db.note.create({
      data: { title: 'Mount inside of play' },
    });

    const canvas = await mount(
      // 👇 Pass data that is created inside of the play function to the component
      //   For example, a just-generated UUID
      <Page {...args} params={{ id: String(note.id) }} />,
    );

    await userEvent.click(await canvas.findByRole('menuitem', { name: /login to add/i }));
  },
  argTypes: {
    // 👇 Make the params prop un-controllable, as the value is always overriden in the play function.
    params: { control: { disable: true } },
  },
};在文件中的每个 story 之前运行代码
有时您可能需要在每个 story 之前运行相同的代码。例如,您可能需要设置组件或模块的初始状态。您可以通过在组件元数据中添加异步 beforeEach 函数来实现此目的。
您可以从 beforeEach 函数返回一个清理函数,该函数将在每个 story 之后运行,当 story 被重新挂载或导航离开时。
通常,您应该在预览文件中的 beforeAll 或 beforeEach 函数中重置组件和模块状态,以确保它适用于您整个项目。但是,如果组件的需求特别独特,您可以使用组件元数据 beforeEach 中返回的清理函数来按需重置状态。
// Replace your-framework with the framework you are using, e.g. react-vite, nextjs, vue3-vite, etc.
import type { Meta, StoryObj } from '@storybook/your-framework';

import MockDate from 'mockdate';

import { Page } from './Page';

const meta = {
  component: Page,
  // 👇 Set the value of Date for every story in the file
  async beforeEach() {
    MockDate.set('2024-02-14');

    // 👇 Reset the Date after each story
    return () => {
      MockDate.reset();
    };
  },
} satisfies Meta<typeof Page>;
export default meta;

type Story = StoryObj<typeof meta>;

export const Default: Story = {
  async play({ canvas }) {
    // ... This will run with the mocked Date
  },
};
为所有测试设置或重置状态
当您修改组件状态时,重置该状态非常重要,然后再渲染另一个 story 以保持测试之间的隔离。
重置状态有两种选择:beforeAll 和 beforeEach。
beforeAll
预览文件(.storybook/preview.js|ts)中的 beforeAll 函数将在项目中的任何 story 之前运行一次,并且不会在 story 之间重新运行。除了在启动测试运行时的初始运行之外,除非更新预览文件,否则它不会再次运行。这是引导您的项目或运行您的整个项目依赖的任何设置的好地方,如下例所示。
您可以从 beforeAll 函数返回一个清理函数,该函数将在重新运行 beforeAll 函数之前或在测试运行器的拆卸过程中运行。
// Replace your-framework with the framework you are using, e.g. react-vite, nextjs, vue3-vite, etc.
import type { Preview } from '@storybook/your-framework';

import { init } from '../project-bootstrap';

const preview: Preview = {
  async beforeAll() {
    await init();
  },
};

export default preview;
beforeEach
与只运行一次的 beforeAll 不同,预览文件(.storybook/preview.js|ts)中的 beforeEach 函数将在项目中的每个 story 之前运行。这最适合用于重置所有或大多数 story 使用的状态或模块。在下面的示例中,我们使用它来重置模拟的 Date。
您可以从 beforeEach 函数返回一个清理函数,该函数将在每个 story 之后运行,当 story 被重新挂载或导航离开时。
// Replace your-framework with the framework you are using, e.g. react-vite, nextjs, vue3-vite, etc.
import type { Preview } from '@storybook/your-framework';

import MockDate from 'mockdate';

const preview: Preview = {
  async beforeEach() {
    MockDate.reset();
  },
};

export default preview;不需要恢复 fn() 模拟,因为 Storybook 在渲染 story 之前会自动执行此操作。有关更多信息,请参阅 parameters.test.restoreMocks API。
在交互之后进行断言
有时,您可能需要在组件渲染和交互后进行断言或运行代码。
afterEach
afterEach 在 story 渲染和 play 函数完成后运行。它可以在预览文件(.storybook/preview.js|ts)的项目级别、组件元数据的组件级别或 story 定义的 story 级别使用。这对于在组件渲染和交互后进行断言或运行代码很有用,例如对最终渲染的输出进行检查或记录信息。
与 play 函数一样,afterEach 接收 context 对象,其中包含 args、canvas 以及与 story 相关的其他属性。您可以使用它来创建断言或在 story 渲染后运行代码。
// Replace your-framework with the framework you are using, e.g. react-vite, nextjs, vue3-vite, etc.
import type { Meta, StoryObj } from '@storybook/your-framework';

import { Page } from './Page';

const meta = {
  component: Page,
  // 👇 Runs after each story in this file
  async afterEach(context) {
    console.log(`✅ Tested ${context.name} story`);
  },
} satisfies Meta<typeof Page>;
export default meta;

type Story = StoryObj<typeof meta>;

export const Default: Story = {
  async play({ canvas }) {
    // ...
  },
};您不应该使用 afterEach 来重置测试中的状态。因为它在 story 之后运行,在此处重置状态可能会阻止您看到 story 的正确最终状态。而是使用beforeEach 返回的清理函数来重置状态,该函数仅在导航于 story 之间时运行,以保留最终状态。
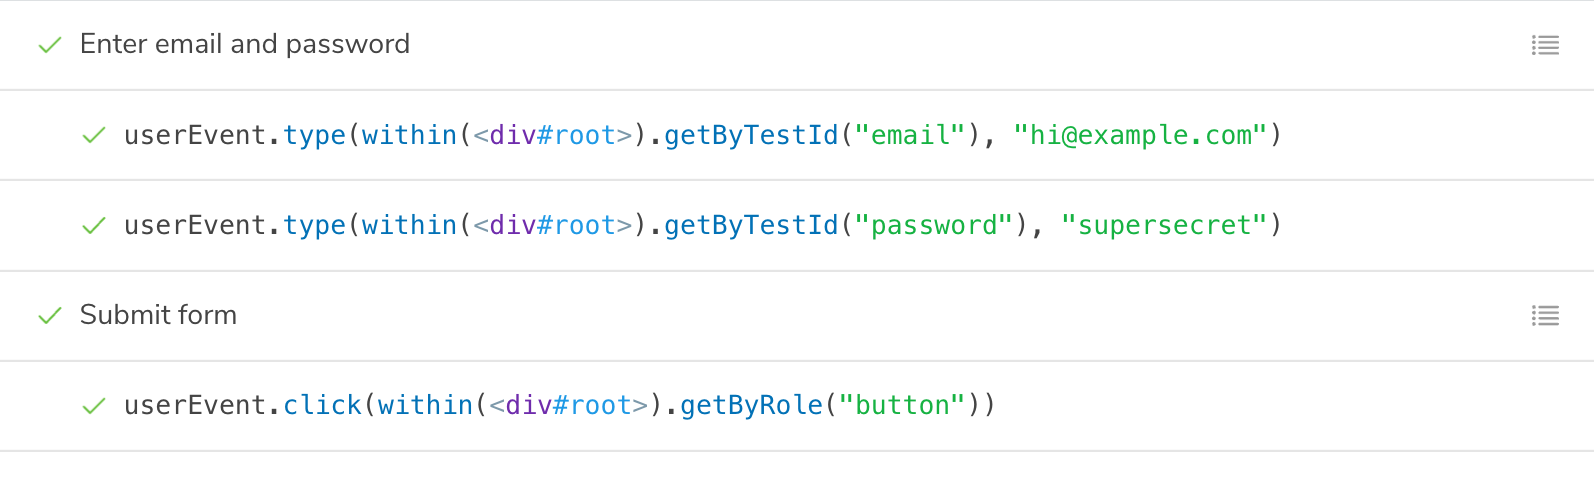
使用 step 函数对交互进行分组
对于复杂的流程,使用 step 函数将相关的交互集分组可能是有益的。这允许您提供一个描述交互集的自定义标签。
// ...rest of story file

export const Submitted: Story = {
  play: async ({ args, canvas, step }) => {
    await step('Enter email and password', async () => {
      await userEvent.type(canvas.getByTestId('email'), 'hi@example.com');
      await userEvent.type(canvas.getByTestId('password'), 'supersecret');
    });

    await step('Submit form', async () => {
      await userEvent.click(canvas.getByRole('button'));
    });
  },
};
这将在可折叠组中显示您的交互。
模拟模块
如果您的组件依赖于导入到组件文件中的模块,您可以模拟这些模块来控制和断言它们的行为。这在模拟模块指南中有详细介绍。然后,您可以将模拟的模块(它具有Vitest 模拟函数的所有有用方法)导入到您的 story 中,并使用它来断言您组件的行为。
// Replace your-framework with the framework you are using, e.g. react-vite, nextjs, vue3-vite, etc.
import type { Meta, StoryObj } from '@storybook/your-framework';

import { expect } from 'storybook/test';

// 👇 Automocked module resolves to '../app/__mocks__/actions'
import { saveNote } from '../app/actions';
import { createNotes } from '../app/mocks/notes';

import NoteUI from './note-ui';

const meta = { component: NoteUI } satisfies Meta<typeof NoteUI>;
export default meta;

type Story = StoryObj<typeof meta>;

const notes = createNotes();

export const SaveFlow: Story = {
  name: 'Save Flow ▶',
  args: {
    isEditing: true,
    note: notes[0],
  },
  play: async ({ canvas, userEvent }) => {
    const saveButton = canvas.getByRole('menuitem', { name: /done/i });
    await userEvent.click(saveButton);
    // 👇 This is the mock function, so you can assert its behavior
    await expect(saveNote).toHaveBeenCalled();
  },
};
运行交互测试
如果您正在使用Vitest 插件,您可以通过以下方式运行您的交互测试:
在 Storybook UI 中,您可以通过单击侧边栏中已展开的测试小部件上的“运行组件测试”按钮,或通过打开 story 或文件夹上的上下文菜单(三个点)并选择“运行组件测试”来运行交互测试。

如果您正在使用测试运行器,您可以在终端或 CI 环境中运行您的交互测试。
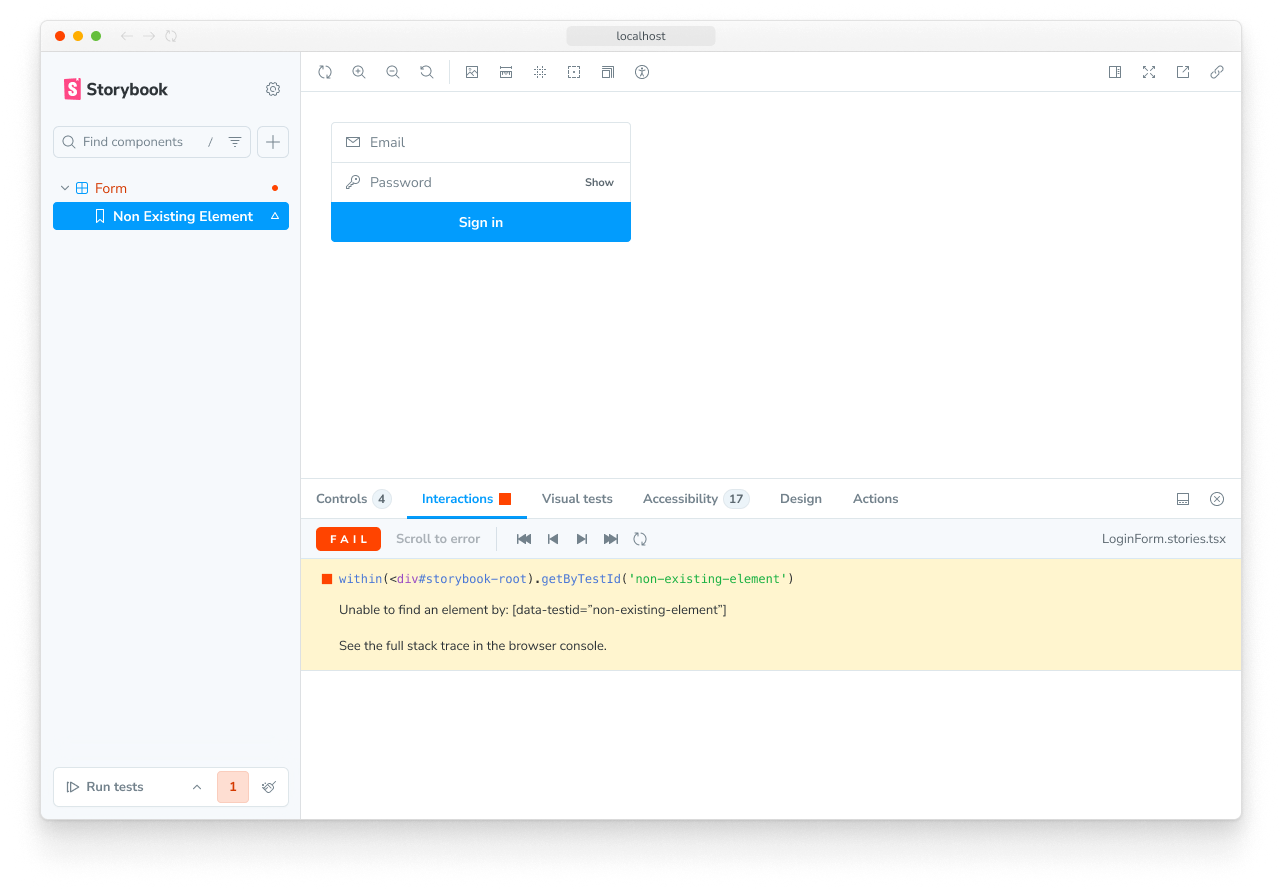
调试交互测试
如果您查看 Interactions 面板,您将看到 play 函数为每个 story 定义的逐步流程。它还提供了一组方便的 UI 控件,用于暂停、恢复、倒带和逐步执行每个交互。
任何测试失败也会在此处显示,从而可以轻松快速地精确找到失败点。在此示例中,在按下登录按钮后,缺少设置 submitted 状态的逻辑。
用于复现的永久链接
由于 Storybook 是一个 Web 应用程序,任何拥有 URL 的人都可以复现该失败,并提供相同的详细信息,无需额外的环境配置或工具。
通过自动发布 Storybook 来进一步简化交互测试。这为团队提供了一个通用的参考点来测试和调试 stories。
CI自动化
当您使用 Vitest 插件运行测试时,在 CI 环境中自动化这些测试就像运行您的测试一样简单。有关更多信息,请参阅 CI 测试指南。
如果您无法使用 Vitest 插件,您仍然可以在 CI 中使用测试运行器来运行您的测试。
故障排除
交互测试与视觉测试有什么区别?
交互测试如果要应用到所有组件,可能会很昂贵。我们建议将它们与其他方法(如视觉测试)结合使用,以实现更全面的覆盖,同时减少维护工作。
交互测试与单独使用 Vitest + Testing Library 有何不同?
交互测试将 Vitest 和 Testing Library 集成到 Storybook 中。最大的好处是能够在真实的浏览器中查看您正在测试的组件。这有助于您进行视觉调试,而不是在命令行中获得(假的)DOM 转储或遇到 JSDOM 模拟浏览器功能的限制。将 stories 和测试放在同一个文件中,而不是将它们分散在各个文件中,也更方便。
更多测试资源
- Vitest addon for running tests in Storybook
- 可访问性测试 用于可访问性
- Visual testing for appearance
- Snapshot testing for rendering errors and warnings
- Test coverage for measuring code coverage
- CI for running tests in your CI/CD pipeline
- End-to-end testing for simulating real user scenarios
- Unit testing for functionality
- Test runner to automate test execution