
索引器
(⚠️ 实验性)
虽然此功能是实验性的,但必须在 StorybookConfig 的 experimental_indexers 属性中指定。
类型: (existingIndexers: Indexer[]) => Promise<Indexer[]>
索引器负责构建 Storybook 的故事索引—即所有故事及其部分元数据的列表,例如 id、title、tags 等。可以在 Storybook 的 /index.json 路由上读取索引。
索引器 API 是一项高级功能,它允许您自定义 Storybook 的索引器,这些索引器决定 Storybook 如何索引文件并将其解析为故事条目。这增加了编写故事的灵活性,包括故事是用什么语言定义的,或者故事从哪里获取。
它们被定义为一个函数,该函数返回包括现有索引器在内的完整索引器列表。这允许您将自己的索引器添加到列表中,或替换现有的索引器。
// Replace your-framework with the framework you are using, e.g. react-vite, nextjs, vue3-vite, etc.
import type { StorybookConfig } from '@storybook/your-framework';

const config: StorybookConfig = {
  framework: '@storybook/your-framework',
  stories: [
    '../src/**/*.mdx',
    '../src/**/*.stories.@(js|jsx|mjs|ts|tsx)',
    // 👇 Make sure files to index are included in `stories`
    '../src/**/*.custom-stories.@(js|jsx|ts|tsx)',
  ],
  experimental_indexers: async (existingIndexers) => {
    const customIndexer = {
      test: /\.custom-stories\.[tj]sx?$/,
      createIndex: async (fileName) => {
        // See API and examples below...
      },
    };
    return [...existingIndexers, customIndexer];
  },
};

export default config;除非您的索引器执行的操作相对简单(例如,使用不同的命名约定索引故事),否则除了索引文件之外,您还需要将其转换为 CSF,以便 Storybook 可以在浏览器中读取它们。
Indexer
类型
{
  test: RegExp;
  createIndex: (fileName: string, options: IndexerOptions) => Promise<IndexInput[]>;
}
指定要索引的文件以及如何将它们索引为故事。
test
(必需)
类型: RegExp
一个正则表达式,用于匹配 stories 配置中应匹配此索引器处理的所有文件的文件名。
createIndex
(必需)
类型: (fileName: string, options: IndexerOptions) => Promise<IndexInput[]>
接受单个 CSF 文件并返回要索引的条目列表的函数。
fileName
类型:string
用于创建要索引的条目的 CSF 文件名。
IndexerOptions
类型
{
  makeTitle: (userTitle?: string) => string;
}
索引文件的选项。
makeTitle
类型: (userTitle?: string) => string
一个函数,它接受用户提供的标题,并返回索引条目的格式化标题,该标题用于侧边栏。如果未提供用户标题,则根据文件名和路径自动生成一个。
有关示例用法,请参见 IndexInput.title。
IndexInput
类型
{
  exportName: string;
  importPath: string;
  type: 'story';
  subtype?: 'story' | 'test';
  rawComponentPath?: string;
  metaId?: string;
  name?: string;
  tags?: string[];
  title?: string;
  __id?: string;
}
表示要添加到故事索引中的故事的对象。
exportName
(必需)
类型:string
对于每个 IndexInput,索引器将从 importPath 找到的文件中添加此导出作为索引中的一个条目。
importPath
(必需)
类型:string
要从中导入的文件,例如 CSF 文件。
很可能正在索引的 fileName 不是 CSF,在这种情况下,您需要将其转换为 CSF,以便 Storybook 可以在浏览器中读取它。
type
(必需)
类型: 'story'
条目的类型。
subtype
(⚠️ 实验性)
类型: 'story' | 'test'
默认值: 'story'
当 type 为 'story' 时,故事条目的子类型。使用此选项将条目标记为测试(实验性)。如果未指定,则默认为 'story'。
rawComponentPath
类型:string
提供 meta.component 的文件的原始路径/包,如果存在的话。
metaId
类型:string
默认值: 从 title 自动生成
定义条目元数据的自定义 ID。
如果指定,CSF 文件中的默认导出(meta)必须具有相应的 id 属性,才能正确匹配。
name
类型:string
默认值: 从 exportName 自动生成
条目的名称。
tags
类型: string[]
用于在 Storybook 及其工具中过滤条目的标签。
title
类型:string
默认值: 从 importPath 的默认导出自动生成
确定条目在侧边栏中的位置。
大多数情况下,您应该不指定标题,以便您的索引器使用默认的命名行为。指定标题时,您必须使用 IndexerOptions 中提供的 makeTitle 函数来使用此行为。例如,这是一个仅仅在从文件名派生的标题前附加“Custom”前缀的索引器。
// Replace your-framework with the framework you are using, e.g. react-vite, nextjs, vue3-vite, etc.
import type { StorybookConfig } from '@storybook/your-framework';
import type { Indexer } from 'storybook/internal/types';

const combosIndexer: Indexer = {
  test: /\.stories\.[tj]sx?$/,
  createIndex: async (fileName, { makeTitle }) => {
    // 👇 Grab title from fileName
    const title = fileName.match(/\/(.*)\.stories/)[1];

    // Read file and generate entries ...
    const entries = [];

    return entries.map((entry) => ({
      type: 'story',
      // 👇 Use makeTitle to format the title
      title: `${makeTitle(title)} Custom`,
      importPath: fileName,
      exportName: entry.name,
    }));
  },
};

const config: StorybookConfig = {
  framework: '@storybook/your-framework',
  stories: ['../src/**/*.mdx', '../src/**/*.stories.@(js|jsx|ts|tsx)'],
  experimental_indexers: async (existingIndexers) => [...existingIndexers, combosIndexer],
};

export default config;
__id
类型:string
默认值: 从 title/metaId 和 exportName 自动生成
定义条目故事的自定义 ID。
如果指定,CSF 文件中的故事必须具有相应的 __id 属性,才能正确匹配。
仅当您需要覆盖自动生成的 ID 时才使用此选项。
转换为 CSF
IndexInput 中的 importPath 的值必须解析为 CSF 文件。然而,大多数自定义索引器之所以有必要,仅仅是因为输入不是 CSF。因此,您很可能需要将输入转换为 CSF,以便 Storybook 可以在浏览器中读取它并渲染您的故事。
将自定义源格式转换为 CSF 超出了本文档的范围。此转换通常在构建器级别(Vite 和/或 Webpack)完成,我们建议使用 unplugin 为多个构建器创建插件。
总体架构如下所示
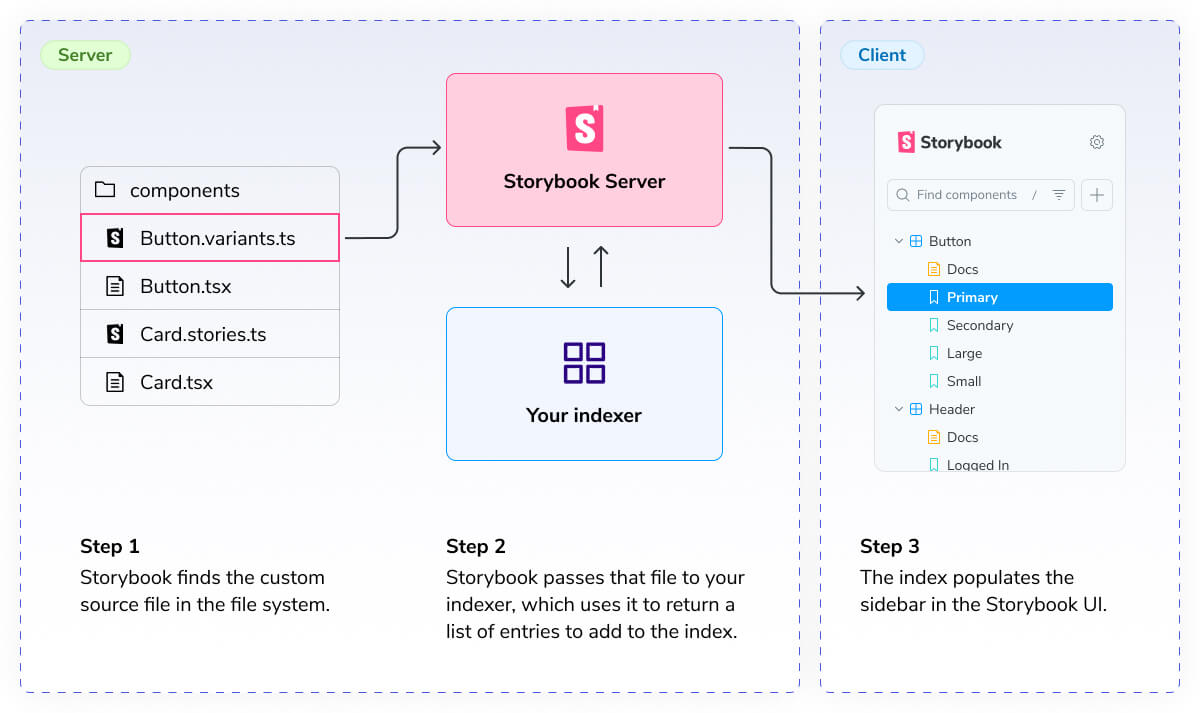
- 使用
stories配置,Storybook 查找所有与索引器的test属性匹配的文件。 - Storybook 将每个匹配的文件传递给您的索引器的
createIndex函数,该函数使用文件内容生成并返回要添加到索引的索引条目(故事)列表。 - 索引会填充 Storybook UI 中的侧边栏。
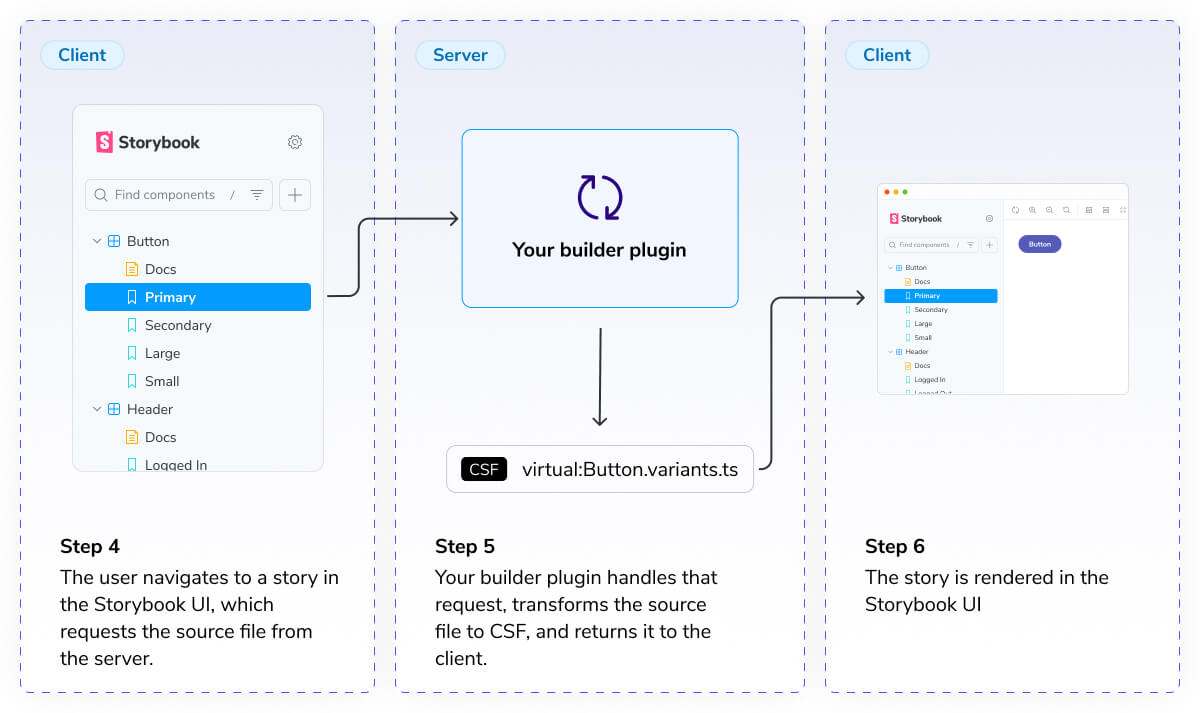
- 在 Storybook UI 中,用户导航到一个与故事 ID 匹配的 URL,浏览器会请求索引条目
importPath属性指定的 CSF 文件。 - 回到服务器端,您的构建器插件将源文件转换为 CSF,并将其提供给客户端。
- Storybook UI 读取 CSF 文件,导入
exportName指定的故事,并将其渲染。
让我们来看一个关于这可能如何工作的例子。
首先,这是一个非 CSF 源文件的示例
// Button.variants.js|ts

import { variantsFromComponent, createStoryFromVariant } from '../utils';
import { Button } from './Button';

/**
 * Returns raw strings representing stories via component props, eg.
 * 'export const PrimaryVariant = {
 *    args: {
 *      primary: true
 *    },
 *  };'
 */
export const generateStories = () => {
  const variants = variantsFromComponent(Button);
  return variants.map((variant) => createStoryFromVariant(variant));
};
然后,构建器插件将
- 接收并读取源文件
- 导入导出的
generateStories函数 - 运行函数生成故事
- 将故事写入 CSF 文件
生成的 CSF 文件随后将被 Storybook 索引。它看起来会像这样
// virtual:Button.variants.js|ts

import { Button } from './Button';

export default {
  component: Button,
};

export const Primary = {
  args: {
    primary: true,
  },
};
示例
自定义索引器的一些示例用法包括
从固定数据或 API 端点动态生成故事
此索引器为基于 JSON 固定数据的组件生成故事。它在项目中查找 *.stories.json 文件,将它们添加到索引中,并单独将它们的内容转换为 CSF。
import type { Indexer } from 'storybook/internal/types';
// Replace your-framework with the framework you are using, e.g. react-vite, nextjs, vue3-vite, etc.
import type { StorybookConfig } from '@storybook/your-framework';

import fs from 'fs/promises';

const jsonStoriesIndexer: Indexer = {
  test: /stories\.json$/,
  createIndex: async (fileName) => {
    const content = JSON.parse(fs.readFileSync(fileName));

    const stories = generateStoryIndexesFromJson(content);

    return stories.map((story) => ({
      type: 'story',
      importPath: `virtual:jsonstories--${fileName}--${story.componentName}`,
      exportName: story.name,
    }));
  },
};

const config: StorybookConfig = {
  framework: '@storybook/your-framework',
  stories: [
    '../src/**/*.mdx',
    '../src/**/*.stories.@(js|jsx|mjs|ts|tsx)',
    // 👇 Make sure files to index are included in `stories`
    '../src/**/*.stories.json',
  ],
  experimental_indexers: async (existingIndexers) => [...existingIndexers, jsonStoriesIndexer],
};

export default config;
一个示例输入 JSON 文件可能如下所示
{
  "Button": {
    "componentPath": "./button/Button.jsx",
    "stories": {
      "Primary": {
        "args": {
          "primary": true
        },
      "Secondary": {
        "args": {
          "primary": false
        }
      }
    }
  },
  "Dialog": {
    "componentPath": "./dialog/Dialog.jsx",
    "stories": {
      "Closed": {},
      "Open": {
        "args": {
          "isOpen": true
        }
      },
    }
  }
}
然后,构建器插件需要将 JSON 文件转换为常规的 CSF 文件。可以使用类似于以下 Vite 插件来完成此转换
// vite-plugin-storybook-json-stories.ts

import type { PluginOption } from 'vite';
import fs from 'fs/promises';

function JsonStoriesPlugin(): PluginOption {
  return {
    name: 'vite-plugin-storybook-json-stories',
    load(id) {
      if (!id.startsWith('virtual:jsonstories')) {
        return;
      }

      const [, fileName, componentName] = id.split('--');
      const content = JSON.parse(fs.readFileSync(fileName));

      const { componentPath, stories } = getComponentStoriesFromJson(content, componentName);

      return `
        import ${componentName} from '${componentPath}';

        export default { component: ${componentName} };

        ${stories.map((story) => `export const ${story.name} = ${story.config};\n`)}
      `;
    },
  };
}
使用备用 API 定义故事
您可以使用自定义索引器和构建器插件来创建您的 API,以定义扩展 CSF 格式的故事。要了解更多信息,请参阅以下 概念验证 来设置自定义索引器以动态生成故事。它包含支持此类功能所需的一切,包括索引器、Vite 插件和 Webpack 加载器。
使用非 JavaScript 语言定义故事
自定义索引器可用于高级目的:用任何语言(包括模板语言)定义故事,并将文件转换为 CSF。要查看此示例,您可以参考 @storybook/addon-svelte-csf(用于 Svelte 模板语法)和 storybook-vue-addon(用于 Vue 模板语法)。
从 URL 集合添加侧边栏链接
索引器 API 非常灵活,可以处理任意内容,只要您的框架工具可以将该内容中的导出转换为实际可运行的故事即可。这个高级示例演示了如何创建自定义索引器来处理 URL 集合,从每个页面提取标题和 URL,并将它们渲染为 UI 中的侧边栏链接。它使用 Svelte 实现,但可以适应任何框架。
首先,创建 URL 集合文件(例如,src/MyLinks.url.js),其中包含以命名导出形式列出的 URL 列表。索引器将使用导出名称作为故事标题,使用值作为唯一标识符。
export default {};

export const DesignTokens = 'https://www.designtokens.org/';
export const CobaltUI = 'https://cobalt-ui.pages.dev/';
export const MiseEnMode = 'https://mode.place/';
export const IndexerAPI = 'https://github.com/storybookjs/storybook/discussions/23176';
调整您的 Vite 配置文件,以包含补充该索引器的自定义插件。这将允许 Storybook 处理和导入 URL 集合文件作为故事。
import * as acorn from 'acorn';
import * as walk from 'acorn-walk';
import { defineConfig, type Plugin } from 'vite';
import { svelte } from '@sveltejs/vite-plugin-svelte';

function StorybookUrlLinksPlugin(): Plugin {
  return {
    name: 'storybook-url-links',
    async transform(code: string, id: string) {
      if (id.endsWith('.url.js')) {
        const ast = acorn.parse(code, {
          ecmaVersion: 2020,
          sourceType: 'module',
        });

        const namedExports: string[] = [];
        let defaultExport = 'export default {};';

        walk.simple(ast, {
          // Extracts the named exports, those represent our stories, and for each of them, we'll return a valid Svelte component.
          ExportNamedDeclaration(node: acorn.ExportNamedDeclaration) {
            if (
              node.declaration &&
              node.declaration.type === 'VariableDeclaration'
            ) {
              node.declaration.declarations.forEach((declaration) => {
                if ('name' in declaration.id) {
                  namedExports.push(declaration.id.name);
                }
              });
            }
          },
          // Preserve our default export.
          ExportDefaultDeclaration(node: acorn.ExportDefaultDeclaration) {
            defaultExport = code.slice(node.start, node.end);
          },
        });

        return {
          code: `
            import RedirectBack from '../../.storybook/components/RedirectBack.svelte';
            ${namedExports
              .map(
                (name) =>
                  `export const ${name} = () => new RedirectBack();`
              )
              .join('\n')}
            ${defaultExport}
          `,
          map: null,
        };
      }
    },
  };
}

export default defineConfig({
  plugins: [StorybookUrlLinksPlugin(), svelte()],
})
更新您的 Storybook 配置(例如,.storybook/main.js|ts)以包含自定义索引器。
// Replace your-framework with the framework you are using, e.g. sveltekit or svelte-vite
import type { StorybookConfig } from '@storybook/your-framework';
import type { Indexer } from 'storybook/internal/types';

const urlIndexer: Indexer = {
  test: /\.url\.js$/,
  createIndex: async (fileName, { makeTitle }) => {
    const fileData = await import(fileName);

    return Object.entries(fileData)
      .filter(([key]) => key != 'default')
      .map(([name, url]) => {
        return {
          type: 'docs',
          importPath: fileName,
          exportName: name,
          title: makeTitle(name)
            .replace(/([a-z])([A-Z])/g, '$1 $2')
            .trim(),
          __id: `url--${name}--${encodeURIComponent(url as string)}`,
          tags: ['!autodocs', 'url']
        };
      });
  }
};

const config: StorybookConfig = {
  stories: ['../src/**/*.stories.@(js|ts|svelte)', '../src/**/*.url.js'],
  framework: {
    name: '@storybook/svelte-vite',
    options: {},
  },
  experimental_indexers: async (existingIndexers) => [urlIndexer, ...existingIndexers]
};
export default config;
添加 Storybook UI 配置文件(例如,.storybook/manager.js|ts)以将索引的 URL 渲染为 UI 中的侧边栏链接。
import { addons } from 'storybook/manager-api';

import SidebarLabelWrapper from './components/SidebarLabelWrapper.tsx';

addons.setConfig({
    sidebar: {
      renderLabel: (item) => SidebarLabelWrapper({ item }),
    },
});
此示例的代码和实时演示可在 StackBlitz 上找到。