构建一个屏幕
我们专注于从底层构建 UI,从小处着手,逐步增加复杂性。这样做使我们能够单独开发每个组件,弄清楚它的数据需求,并在 Storybook 中进行测试。所有这些都不需要启动服务器或构建屏幕!
在本章中,我们将通过组合组件到一个屏幕中,并在 Storybook 中开发该屏幕,来继续提高复杂性。
已连接的屏幕
由于我们的应用程序很简单,我们将要构建的屏幕也非常简单。它只是从远程 API 获取数据,将 `TaskList` 组件(该组件从 Redux 自身提供数据)包装在一些布局中,并从 store 中提取一个顶级的 `error` 字段(假设我们在连接服务器时遇到问题时会设置该字段)。
我们将首先更新我们的 Redux store(在 `src/lib/store.ts` 中),以连接到远程 API 并处理我们应用程序的各种状态(例如,`error`、`succeeded`)。
/* A simple redux store/actions/reducer implementation.
 * A true app would be more complex and separated into different files.
 */
import type { TaskData } from '../types';

import {
  configureStore,
  createSlice,
  createAsyncThunk,
  PayloadAction,
} from '@reduxjs/toolkit';

interface TaskBoxState {
  tasks: TaskData[];
  status: 'idle' | 'loading' | 'failed' | 'succeeded';
  error: string | null;
}

/*
 * The initial state of our store when the app loads.
 * Usually, you would fetch this from a server. Let's not worry about that now
 */
const TaskBoxData: TaskBoxState = {
  tasks: [],
  status: 'idle',
  error: null,
};
/*
 * Creates an asyncThunk to fetch tasks from a remote endpoint.
 * You can read more about Redux Toolkit's thunks in the docs:
 * https://toolkit.redux.js.cn/api/createAsyncThunk
 */
export const fetchTasks = createAsyncThunk('taskbox/fetchTasks', async () => {
  const response = await fetch(
    'https://jsonplaceholder.typicode.com/todos?userId=1'
  );
  const data = await response.json();
  const result = data.map(
    (task: { id: number; title: string; completed: boolean }) => ({
      id: `${task.id}`,
      title: task.title,
      state: task.completed ? 'TASK_ARCHIVED' : 'TASK_INBOX',
    })
  );
  return result;
});

/*
 * The store is created here.
 * You can read more about Redux Toolkit's slices in the docs:
 * https://toolkit.redux.js.cn/api/createSlice
 */
const TasksSlice = createSlice({
  name: 'taskbox',
  initialState: TaskBoxData,
  reducers: {
    updateTaskState: (
      state,
      action: PayloadAction<{ id: string; newTaskState: TaskData['state'] }>
    ) => {
      const task = state.tasks.find((task) => task.id === action.payload.id);
      if (task) {
        task.state = action.payload.newTaskState;
      }
    },
  },
  /*
   * Extends the reducer for the async actions
   * You can read more about it at https://toolkit.redux.js.cn/api/createAsyncThunk
   */
  extraReducers(builder) {
    builder
      .addCase(fetchTasks.pending, (state) => {
        state.status = 'loading';
        state.error = null;
        state.tasks = [];
      })
      .addCase(fetchTasks.fulfilled, (state, action) => {
        state.status = 'succeeded';
        state.error = null;
        // Add any fetched tasks to the array
        state.tasks = action.payload;
      })
      .addCase(fetchTasks.rejected, (state) => {
        state.status = 'failed';
        state.error = 'Something went wrong';
        state.tasks = [];
      });
  },
});

// The actions contained in the slice are exported for usage in our components
export const { updateTaskState } = TasksSlice.actions;

/*
 * Our app's store configuration goes here.
 * Read more about Redux's configureStore in the docs:
 * https://toolkit.redux.js.cn/api/configureStore
 */
const store = configureStore({
  reducer: {
    taskbox: TasksSlice.reducer,
  },
});

// Define RootState and AppDispatch types
export type RootState = ReturnType<typeof store.getState>;
export type AppDispatch = typeof store.dispatch;

export default store;
现在我们已经更新了 store 以从远程 API 端点检索数据,并准备好处理我们应用程序的各种状态,让我们在 `src/components` 目录中创建 `InboxScreen.tsx`。
import { useEffect } from 'react';

import { useDispatch, useSelector } from 'react-redux';

import { AppDispatch, fetchTasks, RootState } from '../lib/store';

import TaskList from "./TaskList";

export default function InboxScreen() {
  const dispatch = useDispatch<AppDispatch>();
  // We're retrieving the error field from our updated store
  const { error } = useSelector((state: RootState) => state.taskbox);
  // The useEffect triggers the data fetching when the component is mounted
  useEffect(() => {
    dispatch(fetchTasks());
  }, []);

  if (error) {
    return (
      <div className="page lists-show">
        <div className="wrapper-message">
          <span className="icon-face-sad" />
          <p className="title-message">Oh no!</p>
          <p className="subtitle-message">Something went wrong</p>
        </div>
      </div>
    );
  }
  return (
    <div className="page lists-show">
      <nav>
        <h1 className="title-page">Taskbox</h1>
      </nav>
      <TaskList />
    </div>
  );
}
我们还需要更改 `App` 组件以渲染 `InboxScreen`(最终,我们将使用路由器来选择正确的屏幕,但现在我们不必担心这一点)。
- import { useState } from 'react'
- import reactLogo from './assets/react.svg'
- import viteLogo from '/vite.svg'
- import './App.css'

+ import './index.css';
+ import store from './lib/store';

+ import { Provider } from 'react-redux';
+ import InboxScreen from './components/InboxScreen';

function App() {
- const [count, setCount] = useState(0)
  return (
-   <div className="App">
-     <div>
-       <a href="https://vite.org.cn" target="_blank">
-         <img src={viteLogo} className="logo" alt="Vite logo" />
-       </a>
-       <a href="https://reactjs.ac.cn" target="_blank">
-         <img src={reactLogo} className="logo react" alt="React logo" />
-       </a>
-     </div>
-     <h1>Vite + React</h1>
-     <div className="card">
-       <button onClick={() => setCount((count) => count + 1)}>
-         count is {count}
-       </button>
-       <p>
-         Edit <code>src/App.jsx</code> and save to test HMR
-       </p>
-     </div>
-     <p className="read-the-docs">
-       Click on the Vite and React logos to learn more
-     </p>
-   </div>
+   <Provider store={store}>
+     <InboxScreen />
+   </Provider>
  );
}
export default App;
然而,事情变得有趣的是在 Storybook 中渲染组件。
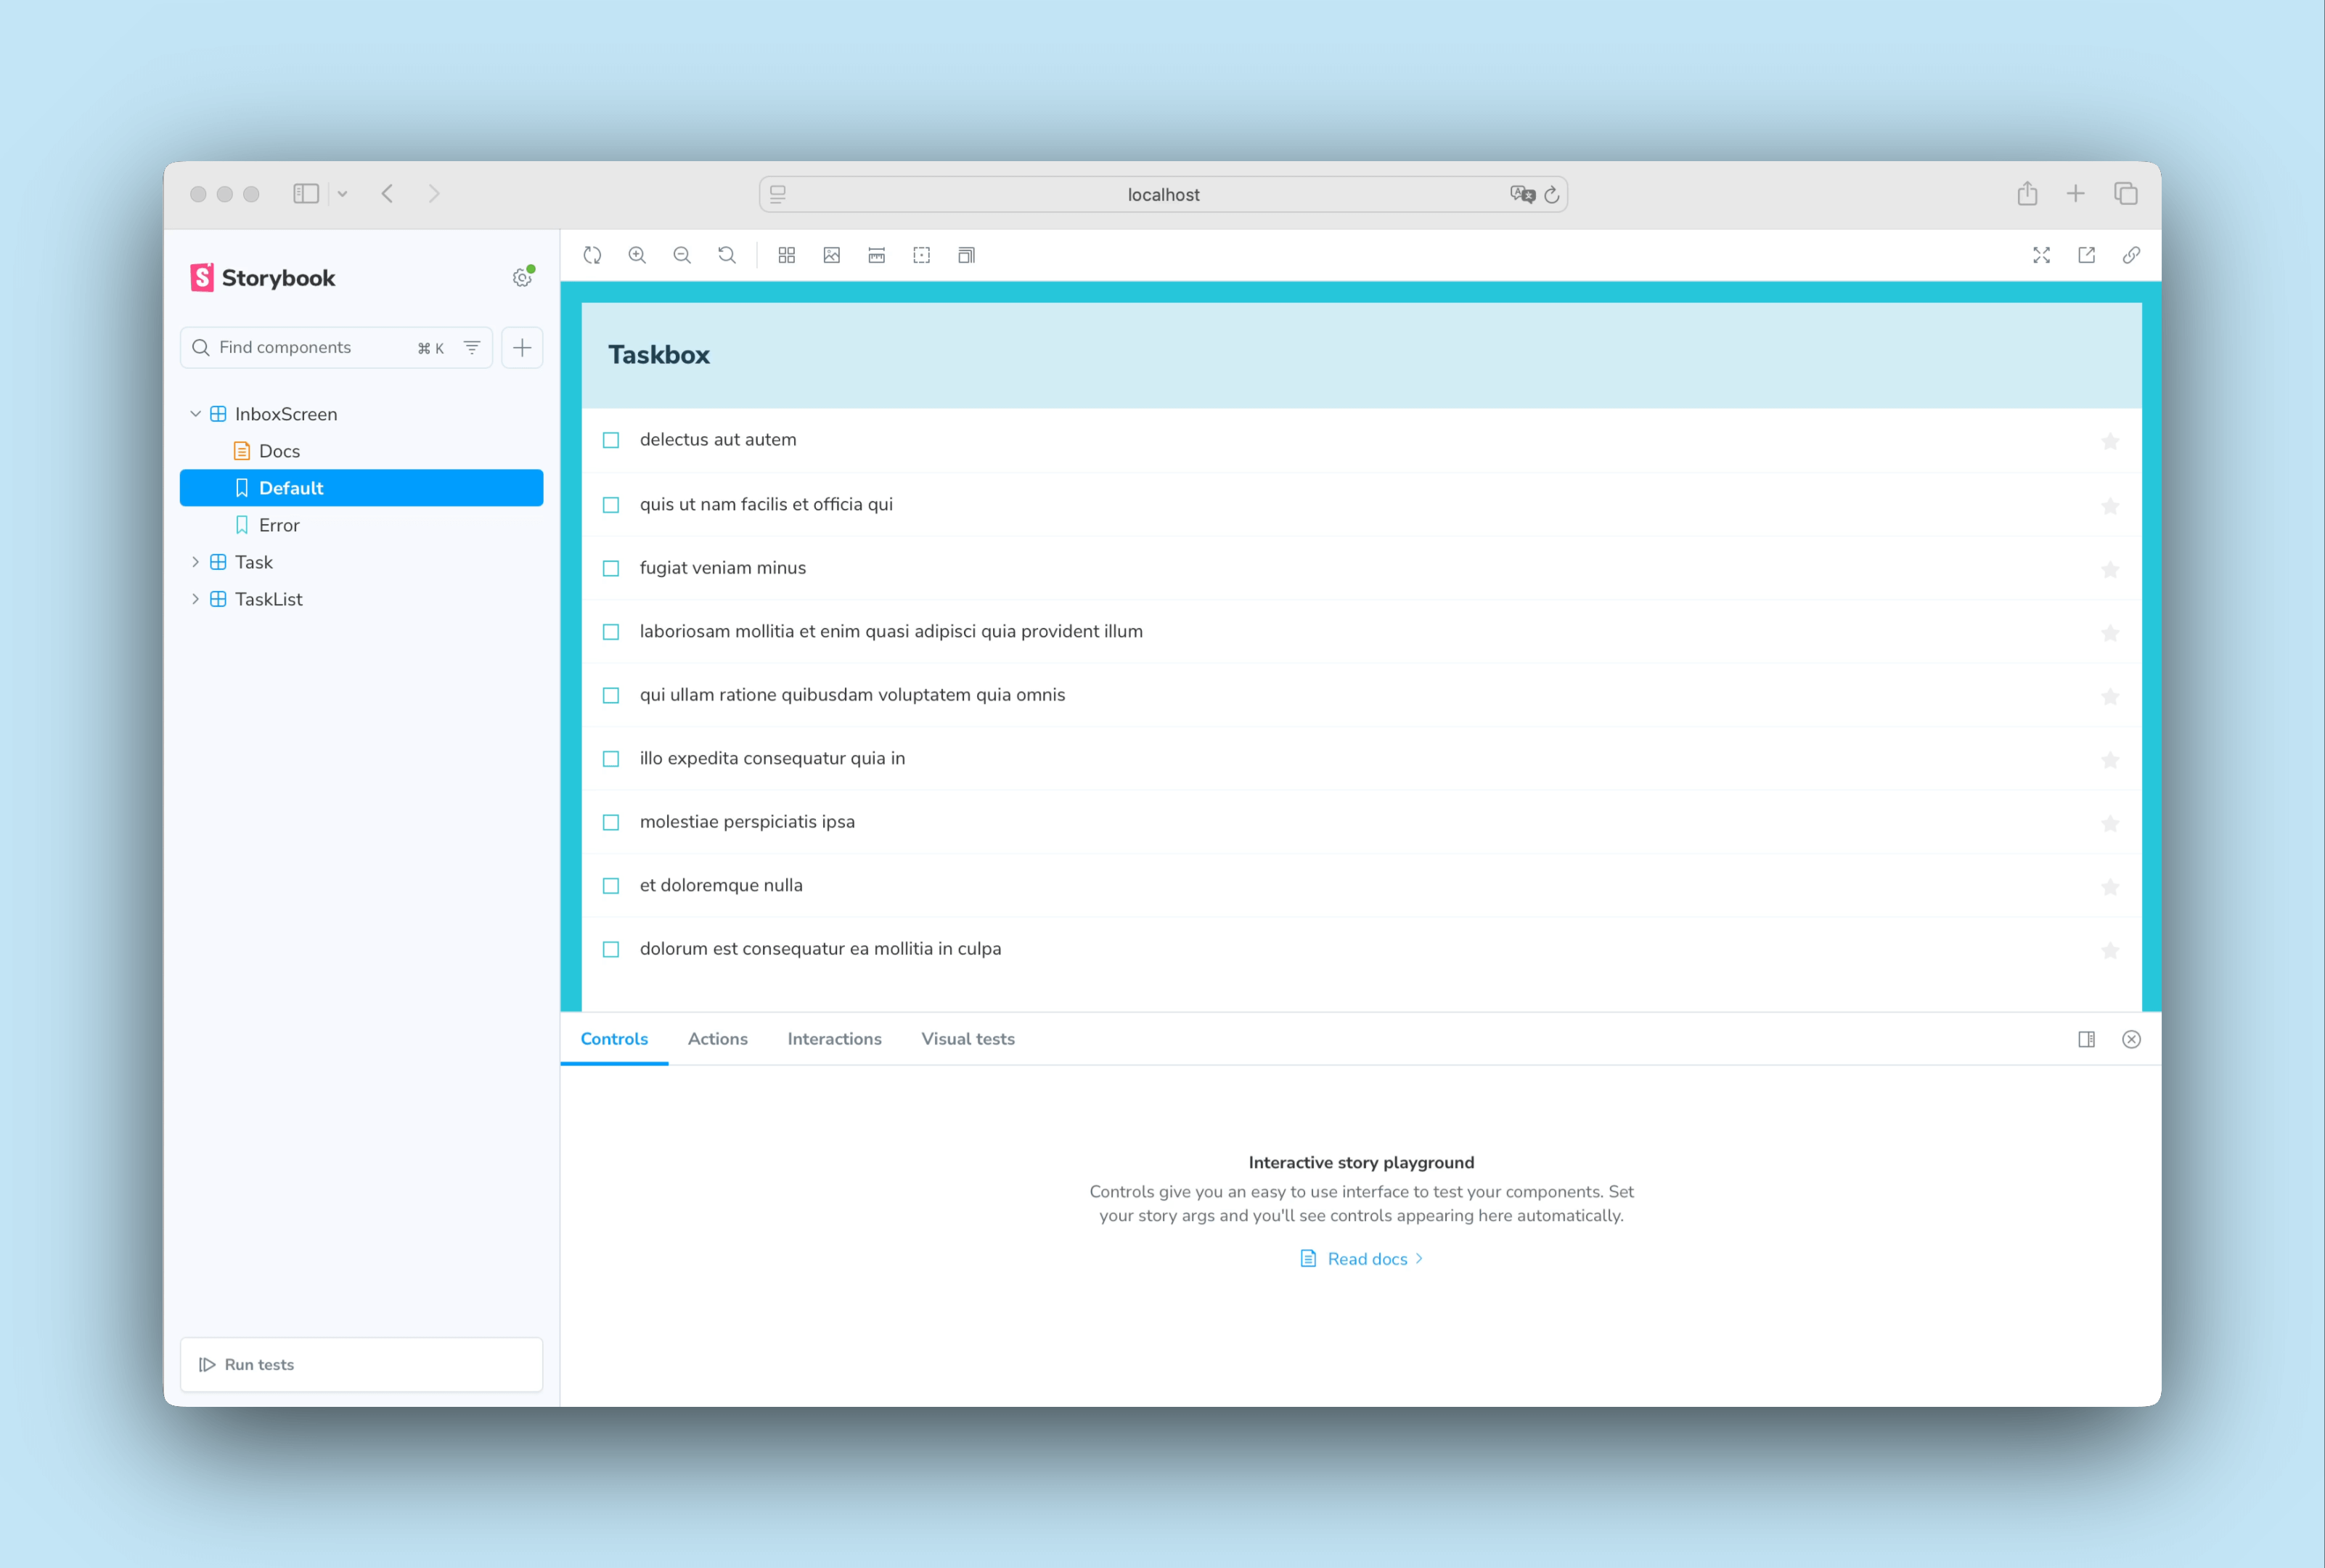
正如我们之前所见,`TaskList` 组件现在是一个**已连接**的组件,并且依赖于 Redux store 来渲染任务。由于我们的 `InboxScreen` 也是一个已连接的组件,我们将做类似的事情并为 story 提供一个 store。因此,当我们设置 `InboxScreen.stories.tsx` 中的 stories 时,
import type { Meta, StoryObj } from '@storybook/react-vite';

import { Provider } from 'react-redux';

import InboxScreen from './InboxScreen';

import store from '../lib/store';

const meta = {
  component: InboxScreen,
  title: 'InboxScreen',
  decorators: [(story) => <Provider store={store}>{story()}</Provider>],
  tags: ['autodocs'],
} satisfies Meta<typeof InboxScreen>;

export default meta;
type Story = StoryObj<typeof meta>;

export const Default: Story = {};

export const Error: Story = {};
我们可以很快发现 `error` story 中存在一个问题。它没有显示正确的状态,而是显示了一个任务列表。解决此问题的一种方法是为每种状态提供一个模拟版本,就像我们在上一章中所做的那样。相反,我们将使用一个知名的 API 模拟库以及一个 Storybook 插件来帮助我们解决此问题。
模拟 API 服务
由于我们的应用程序相当简单,并且不怎么依赖远程 API 调用,我们将使用 Mock Service Worker 和 Storybook 的 MSW 插件。Mock Service Worker 是一个 API 模拟库。它依赖于 service worker 来捕获网络请求并在响应中提供模拟数据。
当我们在 入门部分 设置应用程序时,这两个包也被安装了。剩下的就是配置它们并更新我们的 stories 来使用它们。
在终端中,运行以下命令在 `public` 文件夹中生成一个通用的 service worker。
yarn init-msw
然后,我们需要更新我们的 `.storybook/preview.ts` 并进行初始化。
import type { Preview } from '@storybook/react-vite';

import { initialize, mswLoader } from 'msw-storybook-addon';

import '../src/index.css';

// Registers the msw addon
initialize();

const preview: Preview = {
  parameters: {
    controls: {
      matchers: {
        color: /(background|color)$/i,
        date: /Date$/,
      },
    },
  },
  loaders: [mswLoader],
};

export default preview;
最后,更新 `InboxScreen` stories 并包含一个 参数 来模拟远程 API 调用。
import type { Meta, StoryObj } from '@storybook/react-vite';

+ import { http, HttpResponse } from 'msw';

+ import { MockedState } from './TaskList.stories';

import { Provider } from 'react-redux';

import InboxScreen from './InboxScreen';

import store from '../lib/store';

const meta = {
  component: InboxScreen,
  title: 'InboxScreen',
  decorators: [(story) => <Provider store={store}>{story()}</Provider>],
  tags: ['autodocs'],
} satisfies Meta<typeof InboxScreen>;

export default meta;
type Story = StoryObj<typeof meta>;

export const Default: Story = {
+ parameters: {
+   msw: {
+     handlers: [
+       http.get('https://jsonplaceholder.typicode.com/todos?userId=1', () => {
+         return HttpResponse.json(MockedState.tasks);
+       }),
+     ],
+   },
+ },
};

export const Error: Story = {
+ parameters: {
+   msw: {
+     handlers: [
+       http.get('https://jsonplaceholder.typicode.com/todos?userId=1', () => {
+         return new HttpResponse(null, {
+           status: 403,
+         });
+       }),
+     ],
+   },
+ },
};
检查你的 Storybook,你将看到 `error` story 现在按预期工作。MSW 拦截了我们的远程 API 调用并提供了适当的响应。
交互测试
到目前为止,我们已经能够从头开始构建一个功能齐全的应用程序,从一个简单的组件到一个屏幕,并持续通过我们的 stories 测试每个更改。但是,每个新的 story 也需要手动检查所有其他 stories,以确保 UI 不会中断。这需要大量额外的工作。
我们不能自动化这个工作流程并自动测试组件交互吗?
使用 play 函数编写交互测试
Storybook 的 play 函数可以帮助我们。play 函数包含一些在 story 渲染后运行的小代码片段。它使用框架无关的 DOM API,这意味着我们可以使用 play 函数编写 story 来与 UI 进行交互,并模拟人类行为,无论前端框架如何。我们将使用它们来验证当我们更新任务时 UI 是否按预期运行。
更新你新创建的 `InboxScreen` story,并通过添加以下内容来设置组件交互:
import type { Meta, StoryObj } from '@storybook/react-vite';

+ import { waitFor, waitForElementToBeRemoved } from 'storybook/test';

import { http, HttpResponse } from 'msw';

import { MockedState } from './TaskList.stories';

import { Provider } from 'react-redux';

import InboxScreen from './InboxScreen';

import store from '../lib/store';

const meta = {
  component: InboxScreen,
  title: 'InboxScreen',
  decorators: [(story) => <Provider store={store}>{story()}</Provider>],
  tags: ['autodocs'],
} satisfies Meta<typeof InboxScreen>;

export default meta;
type Story = StoryObj<typeof meta>;

export const Default: Story = {
  parameters: {
    msw: {
      handlers: [
        http.get('https://jsonplaceholder.typicode.com/todos?userId=1', () => {
          return HttpResponse.json(MockedState.tasks);
        }),
      ],
    },
  },
+ play: async ({ canvas, userEvent }) => {
+   // Waits for the component to transition from the loading state
+   await waitForElementToBeRemoved(await canvas.findByTestId('loading'));
+   // Waits for the component to be updated based on the store
+   await waitFor(async () => {
+     // Simulates pinning the first task
+     await userEvent.click(canvas.getByLabelText('pinTask-1'));
+     // Simulates pinning the third task
+     await userEvent.click(canvas.getByLabelText('pinTask-3'));
+   });
+ },
};

export const Error: Story = {
  parameters: {
    msw: {
      handlers: [
        http.get('https://jsonplaceholder.typicode.com/todos?userId=1', () => {
          return new HttpResponse(null, {
            status: 403,
          });
        }),
      ],
    },
  },
};
💡 `Interactions` 面板帮助我们可视化 Storybook 中的测试,提供一个逐步流程。它还提供了一组方便的 UI 控件来暂停、恢复、倒带和逐步执行每个交互。
检查 `Default` story。点击 `Interactions` 面板以查看 story 的 play 函数中的交互列表。
使用 Vitest 插件自动化测试
借助 play 函数,我们可以快速模拟组件的用户交互,并验证我们在更新任务时它的行为——保持 UI 的一致性。然而,如果我们看看我们的 Storybook,我们可以看到我们的交互测试只在查看 story 时运行。这意味着,如果我们进行更改,我们仍然必须手动检查每个 story 来运行所有检查。我们不能自动化它吗?
我们可以!Storybook 的 Vitest 插件 允许我们以更自动化的方式运行交互测试,利用 Vitest 的强大功能来获得更快、更高效的测试体验。让我们看看它是如何工作的!
当你的 Storybook 运行时,点击侧边栏中的“运行测试”。这将对我们的 stories、它们的渲染方式、它们的行为以及 play 函数中定义的交互进行测试,包括我们刚刚添加到 `InboxScreen` story 的那个。
💡 Vitest 插件可以做的远不止我们在这里看到的,包括其他类型的测试。我们建议阅读 官方文档 以了解更多关于它的信息。
现在,我们有了一个工具,可以帮助我们自动化 UI 测试,而无需手动检查。这是在继续构建应用程序时确保 UI 保持一致和功能强大的好方法。更重要的是,如果我们的测试失败,我们将立即收到通知,使我们能够快速轻松地修复任何未解决的问题。
组件驱动开发
我们从 `Task` 开始,然后是 `TaskList`,现在我们有了整个屏幕 UI。我们的 `InboxScreen` 容纳了已连接的组件,并包含相应的 stories。
组件驱动开发 允许你在向上移动组件层级时逐步增加复杂性。其优点包括更集中的开发流程和对所有可能的 UI 排列的更高覆盖率。总之,CDD 有助于构建更高质量、更复杂的 UI。
我们还没有完成——工作并不会在 UI 构建完成后就结束。我们还需要确保它在长时间内保持稳定。