构建一个屏幕
我们一直专注于自下而上地构建 UI,从小型组件开始逐步增加复杂性。这样做的好处是,我们可以在隔离的环境中开发每个组件,弄清楚其数据需求,并在 Storybook 中进行调试。这一切都无需搭建服务器或构建完整的屏幕!
在本章中,我们将通过在屏幕中组合组件并在 Storybook 中开发该屏幕来继续增加复杂性。
嵌套容器组件
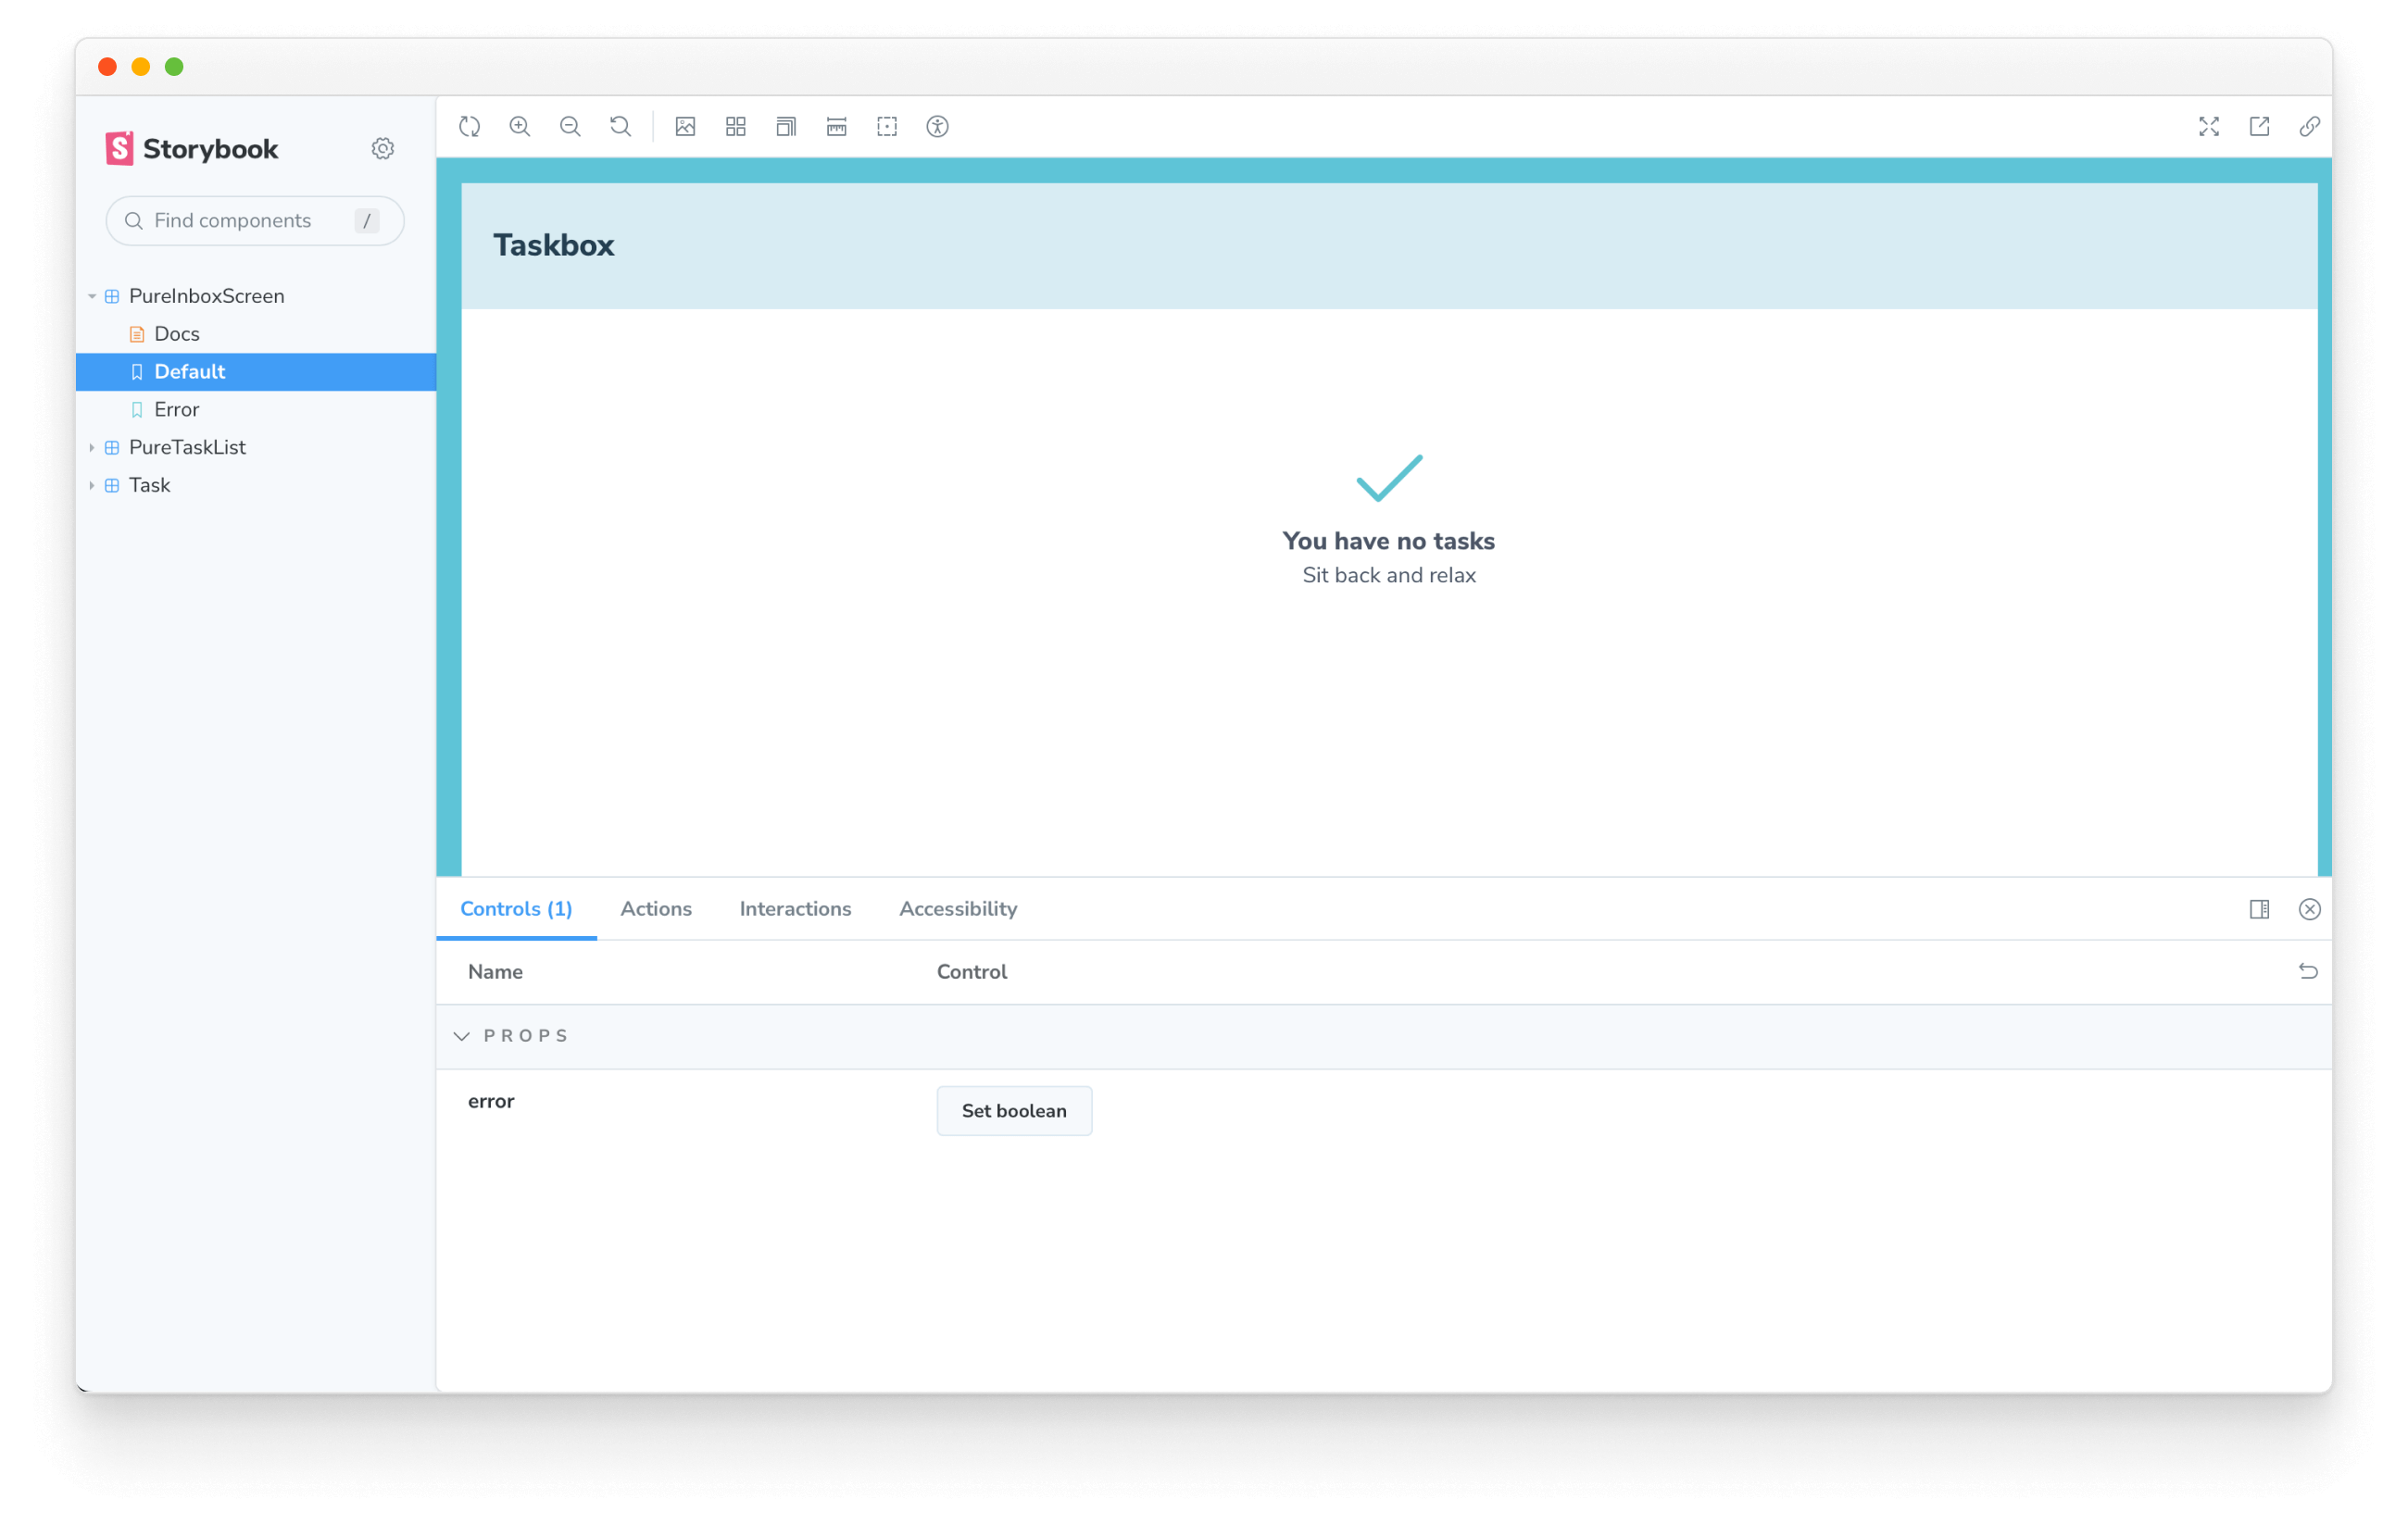
由于我们的应用很简单,我们将要构建的屏幕也相当简单,只需将 TaskList 组件(它通过 Pinia 提供自己的数据)包装在某个布局中,并从 store 中取出顶级的 error 字段(假设如果连接服务器时遇到问题,我们将设置该字段)。让我们在 src/components/ 文件夹中创建一个展示型组件 PureInboxScreen.vue
<template>
  <div>
    <div v-if="error" class="page lists-show">
      <div class="wrapper-message">
        <span class="icon-face-sad" />
        <p class="title-message">Oh no!</p>
        <p class="subtitle-message">Something went wrong</p>
      </div>
    </div>
    <div v-else class="page lists-show">
      <nav>
        <h1 class="title-page">Taskbox</h1>
      </nav>
      <TaskList />
    </div>
  </div>
</template>

<script>
import TaskList from './TaskList.vue';
export default {
  name: 'PureInboxScreen',
  components: { TaskList },
  props: {
    error: { type: Boolean, default: false },
  },
};
</script>
然后,我们可以创建一个容器组件,它同样会在 src/components/InboxScreen.vue 中获取 PureInboxScreen 所需的数据
<template>
  <PureInboxScreen :error="isError" />
</template>

<script>
import PureInboxScreen from './PureInboxScreen.vue';

import { computed } from 'vue';

import { useTaskStore } from '../store';

export default {
  name: 'InboxScreen',
  components: { PureInboxScreen },
  setup() {
    //👇 Creates a store instance
    const store = useTaskStore();

    //👇 Retrieves the error from the store's state
    const isError = computed(() => store.status==='error');
    return {
      isError,
    };
  },
};
</script>
接下来,我们需要更新应用的入口文件 (src/main.js),以便我们可以相对快速地将 store 连接到我们的组件层级结构中
import { createApp } from 'vue';
+ import { createPinia } from 'pinia';
- import './assets/main.css';

import App from './App.vue';

- createApp(App).mount('#app')
+ createApp(App).use(createPinia()).mount('#app');
我们还需要修改 App 组件来渲染 InboxScreen(最终,我们会使用路由来选择正确的屏幕,但这里先不考虑这个问题)
<script setup>
import InboxScreen from './components/InboxScreen.vue';
</script>

<template>
  <div id="app">
    <InboxScreen />
  </div>
</template>

<style>
@import './index.css';
</style>
然而,有趣的地方在于如何在 Storybook 中渲染 story。
正如我们之前所见,TaskList 组件是一个容器,它渲染了 PureTaskList 展示型组件。根据定义,容器组件不能简单地独立渲染;它们需要被传递一些上下文或连接到某个服务。这意味着要在 Storybook 中渲染容器组件,我们必须模拟(即提供一个模拟版本)它所需的上下文或服务。
在将 TaskList 放入 Storybook 时,我们通过简单地渲染 PureTaskList 并避开容器组件来规避了这个问题。我们也会做类似的事情,在 Storybook 中渲染 PureInboxScreen。
然而,PureInboxScreen 组件存在一个问题,尽管 PureInboxScreen 本身是展示型的,但它的子组件 TaskList 不是。从某种意义上说,PureInboxScreen 被“容器性”污染了。因此,当我们在 src/components/PureInboxScreen.stories.js 中设置 stories 时
import PureInboxScreen from './PureInboxScreen.vue';

export default {
  component: PureInboxScreen,
  title: 'PureInboxScreen',
  tags: ['autodocs'],
};

export const Default = {};

export const Error = {
  args: { error: true },
}
我们会发现,尽管 error story 工作正常,但在 default story 中却有问题,因为 TaskList 没有 Pinia store 可以连接。
一种规避此问题的方法是,除了顶层之外,永远不要在应用中的任何地方渲染容器组件,而是将所有数据需求通过组件层级向下传递。
然而,开发者不可避免地需要在组件层级中更深的位置渲染容器组件。如果我们想在 Storybook 中渲染大部分或整个应用(我们确实想!),就需要一个解决此问题的方法。
为 stories 提供上下文
好消息是,将 Storybook 连接到 Pinia store 并跨 stories 重用它非常容易!我们可以更新 .storybook/preview.js 配置文件,并依靠 Storybook 的 setup 函数来注册我们现有的 Pinia store
+ import { setup } from '@storybook/vue3';

+ import { createPinia } from 'pinia';

import '../src/index.css';

//👇 Registers a global Pinia instance inside Storybook to be consumed by existing stories
+ setup((app) => {
+   app.use(createPinia());
+ });

/** @type { import('@storybook/vue3').Preview } */
const preview = {
  parameters: {
    controls: {
      matchers: {
        color: /(background|color)$/i,
        date: /Date$/,
      },
    },
  },
};

export default preview;
类似的 approaches 也存在于为其他数据库提供模拟上下文,例如 Apollo、Relay 等。
在 Storybook 中循环切换状态可以轻松测试我们是否正确完成了此操作
组件测试
到目前为止,我们已经能够从零开始构建一个功能齐全的应用,从一个简单组件到整个屏幕,并使用我们的 stories 持续测试每次更改。但每一个新的 story 也都需要手动检查所有其他 stories,以确保 UI 没有损坏。这增加了大量额外的工作。
我们能否自动化这个工作流程并自动测试我们的组件交互?
使用 play 函数编写组件测试
Storybook 的 play 函数和 @storybook/addon-interactions 插件可以帮助我们实现这一点。play 函数包含在 story 渲染后运行的小段代码。
play 函数帮助我们验证任务更新时 UI 会发生什么变化。它使用与框架无关的 DOM API,这意味着无论使用哪种前端框架,我们都可以使用 play 函数编写 stories,与 UI 交互并模拟人类行为。
@storybook/addon-interactions 插件帮助我们在 Storybook 中可视化测试,提供一步一步的流程。它还提供了一系列方便的 UI 控件,用于暂停、继续、回退和逐步执行每个交互。
让我们看看它的实际应用!更新你刚刚创建的 PureInboxScreen story,并通过添加以下内容来设置组件交互
import PureInboxScreen from './PureInboxScreen.vue';

+ import { fireEvent, within } from '@storybook/test';

export default {
  component: PureInboxScreen,
  title: 'PureInboxScreen',
  tags: ['autodocs'],
};

export const Default = {};

export const Error = {
  args: { error: true },
};

+ export const WithInteractions = {
+  play: async ({ canvasElement }) => {
+    const canvas = within(canvasElement);
+    // Simulates pinning the first task
+    await fireEvent.click(canvas.getByLabelText('pinTask-1'));
+    // Simulates pinning the third task
+    await fireEvent.click(canvas.getByLabelText('pinTask-3'));
+  },
+ };
💡 @storybook/test 包替代了 @storybook/jest 和 @storybook/testing-library 测试包,提供了更小的包体积和基于 Vitest 包的更简单的 API。
检查你刚刚创建的 story。点击 Interactions 面板,查看 story 的 play 函数中的交互列表。
使用 test runner 自动化测试
借助 Storybook 的 play 函数,我们能够规避问题,与 UI 进行交互并快速检查更新任务时的响应情况——无需额外的手动工作即可保持 UI 的一致性。
但是,如果我们仔细观察 Storybook,就会发现它只在查看 story 时运行交互测试。因此,如果我们做出更改,仍然必须遍历每个 story 来运行所有检查。我们不能自动化它吗?
好消息是我们能做到!Storybook 的 test runner 正好可以实现这一点。它是一个独立的工具——由 Playwright 提供支持——可以运行我们所有的交互测试并捕获损坏的 stories。
让我们看看它是如何工作的!运行以下命令进行安装
yarn add --dev @storybook/test-runner
接下来,更新你的 package.json 中的 scripts,并添加一个新的测试任务
{
  "scripts": {
    "test-storybook": "test-storybook"
  }
}
最后,在 Storybook 运行的情况下,打开一个新的终端窗口并运行以下命令
yarn test-storybook --watch
💡 使用 play 函数进行组件测试是测试 UI 组件的绝佳方法。它能做的远不止我们在此看到的;我们建议阅读官方文档以了解更多信息。
要更深入地了解测试,请查阅测试手册。它涵盖了规模化前端团队使用的测试策略,可以极大地提升你的开发效率。
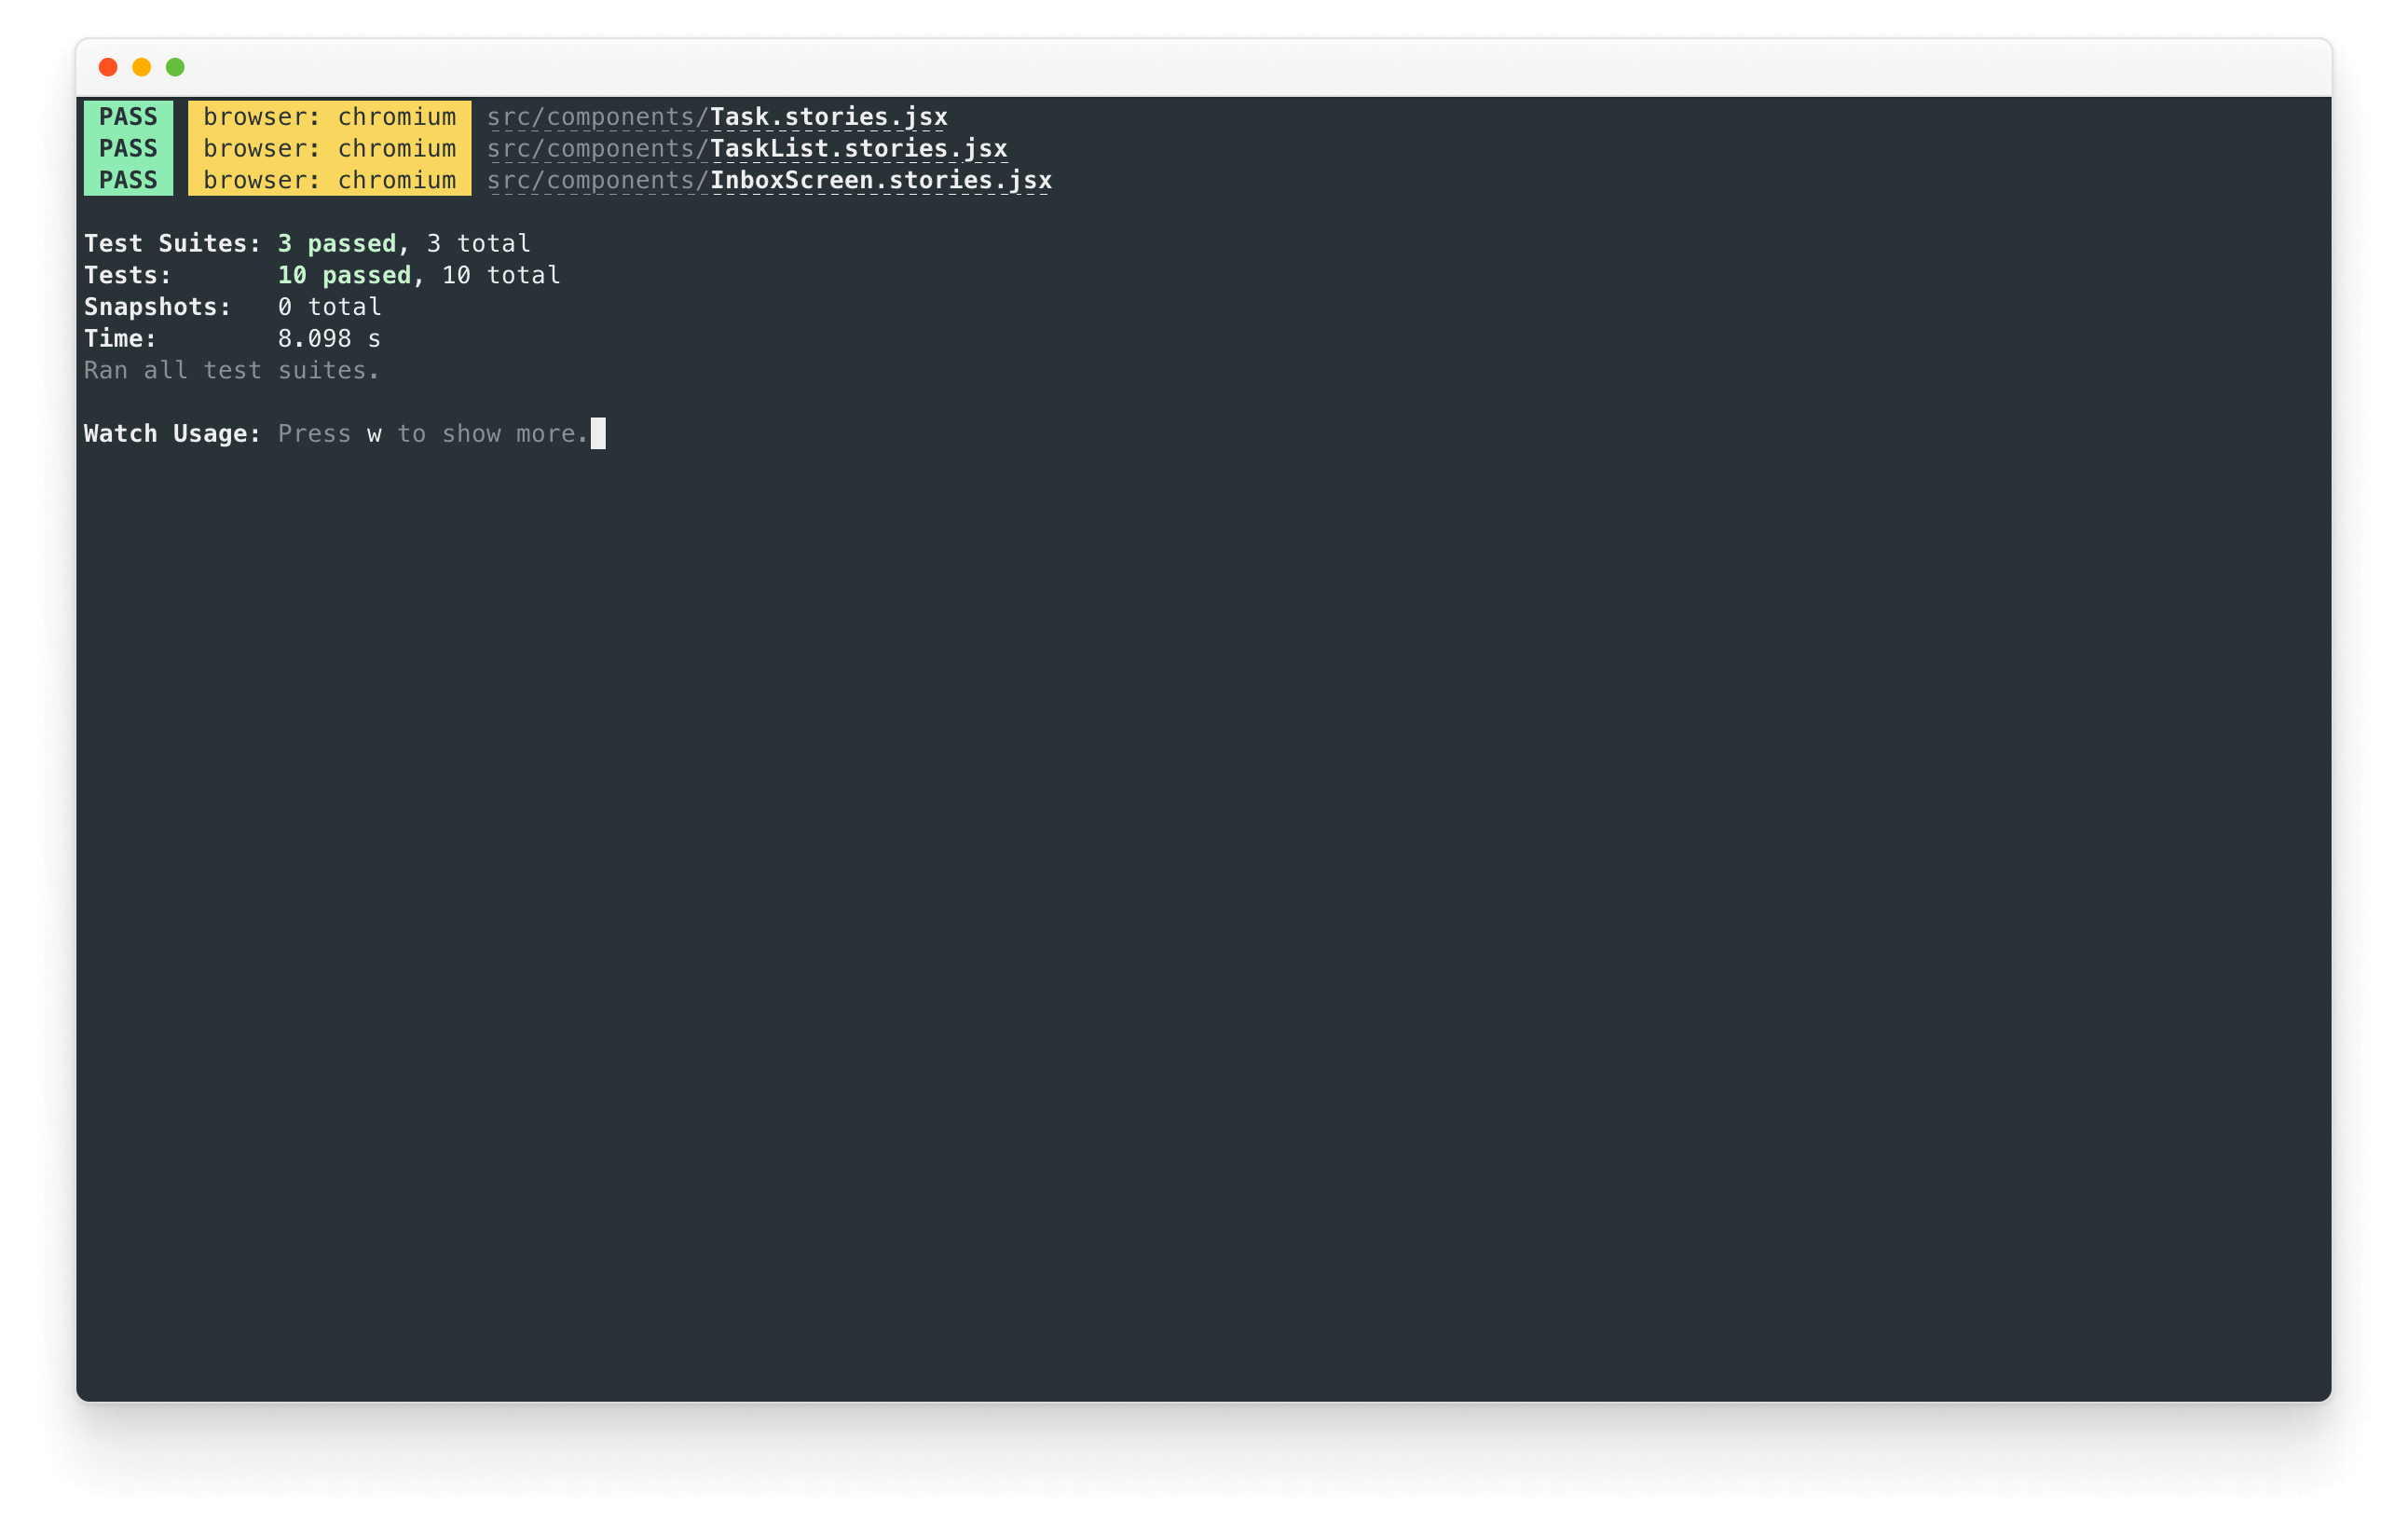
成功!现在我们有了一个工具,可以帮助我们自动验证所有的 stories 是否都能无误渲染,并且所有断言都通过。更重要的是,如果测试失败,它将提供一个链接,可以在浏览器中打开失败的 story。
组件驱动开发
我们从底层的 Task 开始,然后发展到 TaskList,现在我们拥有了一个完整的屏幕 UI。我们的 InboxScreen 包含一个嵌套的容器组件以及配套的 stories。
组件驱动开发 (Component-Driven Development) 允许你随着组件层级的向上移动逐渐扩展复杂性。其优点包括更集中的开发流程以及增加对所有可能 UI 排列组合的覆盖范围。简而言之,CDD 帮助你构建更高质量、更复杂的 UI。
我们还没完成——当 UI 构建完成后,工作并没有结束。我们还需要确保它随着时间的推移保持稳定。