如何测试组件交互
了解如何模拟用户行为并运行功能检查

你打开开关,灯却没亮。可能是灯泡烧坏了,也可能是线路故障。开关和灯泡通过墙里的电线连接在一起。
应用程序也是如此。表面上是用户看到和交互的 UI。在底层,UI 被连接起来以促进数据流和事件流。
当你构建更复杂的 UI(如页面)时,组件不仅要负责渲染 UI。它们还要获取数据并管理状态。本文将介绍如何测试交互式组件。你将学会如何使用计算机模拟和验证用户交互。
那个组件真的能用吗?
组件的主要任务是根据一组 props 渲染 UI 的一部分。更复杂的组件还会跟踪应用程序状态并将行为传递给组件树。
例如,一个组件会从一个初始状态开始。当用户在输入字段中输入内容或单击按钮时,它会在应用程序中触发一个事件。组件会响应此事件来更新状态。然后,这些状态更改会更新渲染的 UI。这就是交互的完整周期。
考虑我在上一篇文章中介绍的 Taskbox 应用程序。在 InboxScreen 中,用户可以单击星形图标来固定一个任务。或单击复选框来将其存档。视觉测试确保组件在所有这些状态下看起来都正确。我们还需要确保 UI 正确响应这些交互。
交互测试工作流程如下所示
- 📝 设置:隔离组件并提供适当的 props 以进行初始状态设置。
- 🤖 操作:渲染组件并模拟交互。
- ✅ 运行断言以验证状态是否已正确更新。
Taskbox 应用程序是使用 Create React App 引导的,该应用程序预装了Jest。我们将使用它来编写和运行测试。
测试组件的功能,而不是它的实现方式
与单元测试类似,我们希望避免测试组件的内部工作原理。这会使测试变得脆弱,因为每次重构代码时,无论输出是否更改,都会中断测试。这反过来会减慢你的速度。
这就是为什么 Adobe、Twilio、Gatsby 等许多团队都在使用Testing-Library。它允许你评估渲染的输出。它通过在虚拟浏览器(JSDOM)中挂载组件并提供复制用户交互的实用程序来工作。
我们可以编写模仿真实使用场景的测试,而不是访问组件的内部状态和方法。从用户的角度编写测试使我们更有信心代码能够正常工作。
让我们深入研究一些代码,看看这个过程是如何进行的。这次我们的起点是composition-testing 分支。
重复使用 stories 作为交互测试用例
我们从编写测试用例开始。之前,我们在 InboxScreen.stories.js 文件中记录了 InboxScreen 组件的所有用例。这使我们能够在开发过程中进行外观抽查,并通过视觉测试捕获回归。这些 stories 现在也将为我们的交互测试提供支持。
// InboxScreen.stories.js
import React from 'react';
import { rest } from 'msw';
import { InboxScreen } from './InboxScreen';
import { Default as TaskListDefault } from './components/TaskList.stories';

export default {
 component: InboxScreen,
 title: 'InboxScreen',
};

const Template = (args) => <InboxScreen {...args} />;

export const Default = Template.bind({});
Default.parameters = {
 msw: [
   rest.get('/tasks', (req, res, ctx) => {
     return res(ctx.json(TaskListDefault.args));
   }),
 ],
};

export const Error = Template.bind({});
Error.args = {
 error: 'Something',
};
Error.parameters = {
 msw: [
   rest.get('/tasks', (req, res, ctx) => {
     return res(ctx.json([]));
   }),
 ],
};
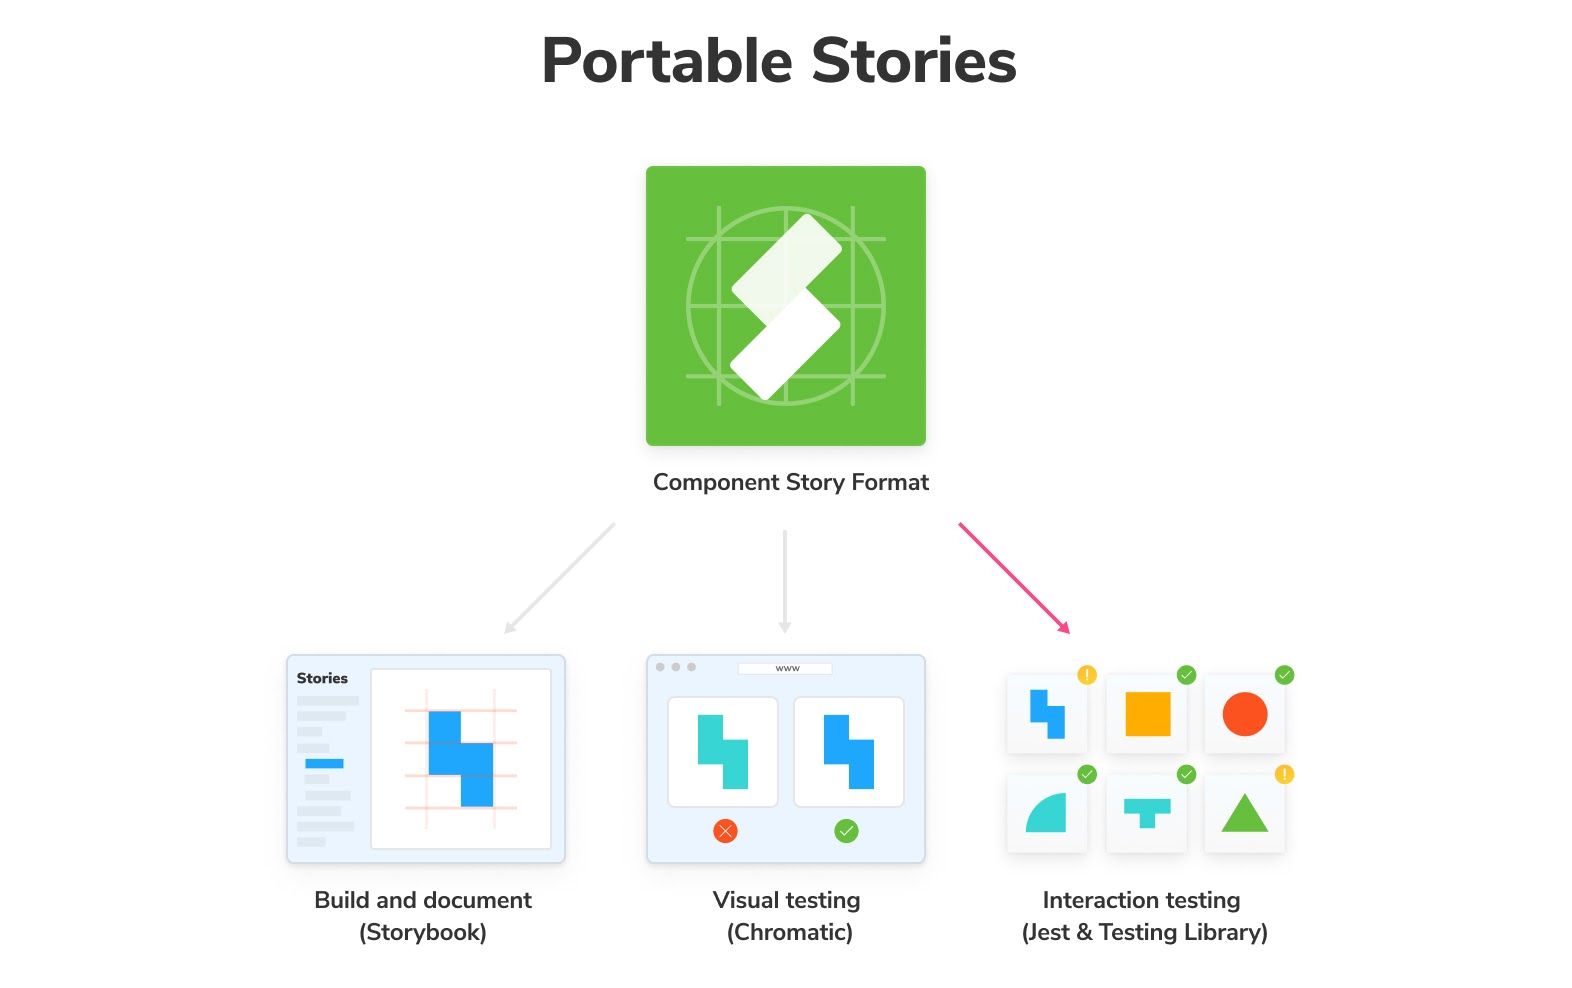
Stories 是用基于标准 JavaScript 模块的可移植格式编写的。你可以将它们与任何基于 JavaScript 的测试库(Jest、Testing Lib、Playwright)一起重用。这样你就不需要为你的测试套件中的每个测试工具设置和维护测试用例了。例如,Adobe Spectrum 设计系统团队使用这种模式来测试其菜单和对话框组件的交互。
当你将测试用例编写为 stories 时,可以为其添加任何形式的断言。让我们来试试。创建 InboxScreen.test.js 文件并编写第一个测试。与上面的示例一样,我们将一个 story 导入到这个测试中,并使用 Testing-Library 的 render 函数将其挂载。
it 块描述了我们的测试。我们从渲染组件开始,等待它获取数据,找到一个特定的任务,然后单击 pin 按钮。断言检查以查看 pinned 状态是否已更新。最后,afterEach 块通过卸载测试期间挂载的 React 树来清理。
// InboxScreen.test.js
import React from 'react';
import '@testing-library/jest-dom/extend-expect';
import { render, waitFor, cleanup } from '@testing-library/react';
import * as stories from './InboxScreen.stories';

describe('InboxScreen', () => {
 afterEach(() => {
   cleanup();
 });

 const { Default } = stories;

 it('should pin a task', async () => {
   const { queryByText, getByRole } = render(<Default />);

   await waitFor(() => {
     expect(queryByText('You have no tasks')).not.toBeInTheDocument();
   });

   const getTask = () => getByRole('listitem', { name: 'Export logo' });

   const pinButton = within(getTask()).getByRole('button', { name: 'pin' });

   fireEvent.click(pinButton);

   const unpinButton = within(getTask()).getByRole('button', {
     name: 'unpin',
   });

   expect(unpinButton).toBeInTheDocument();
 });
});
运行 yarn test 来启动 Jest。你会发现测试失败了。
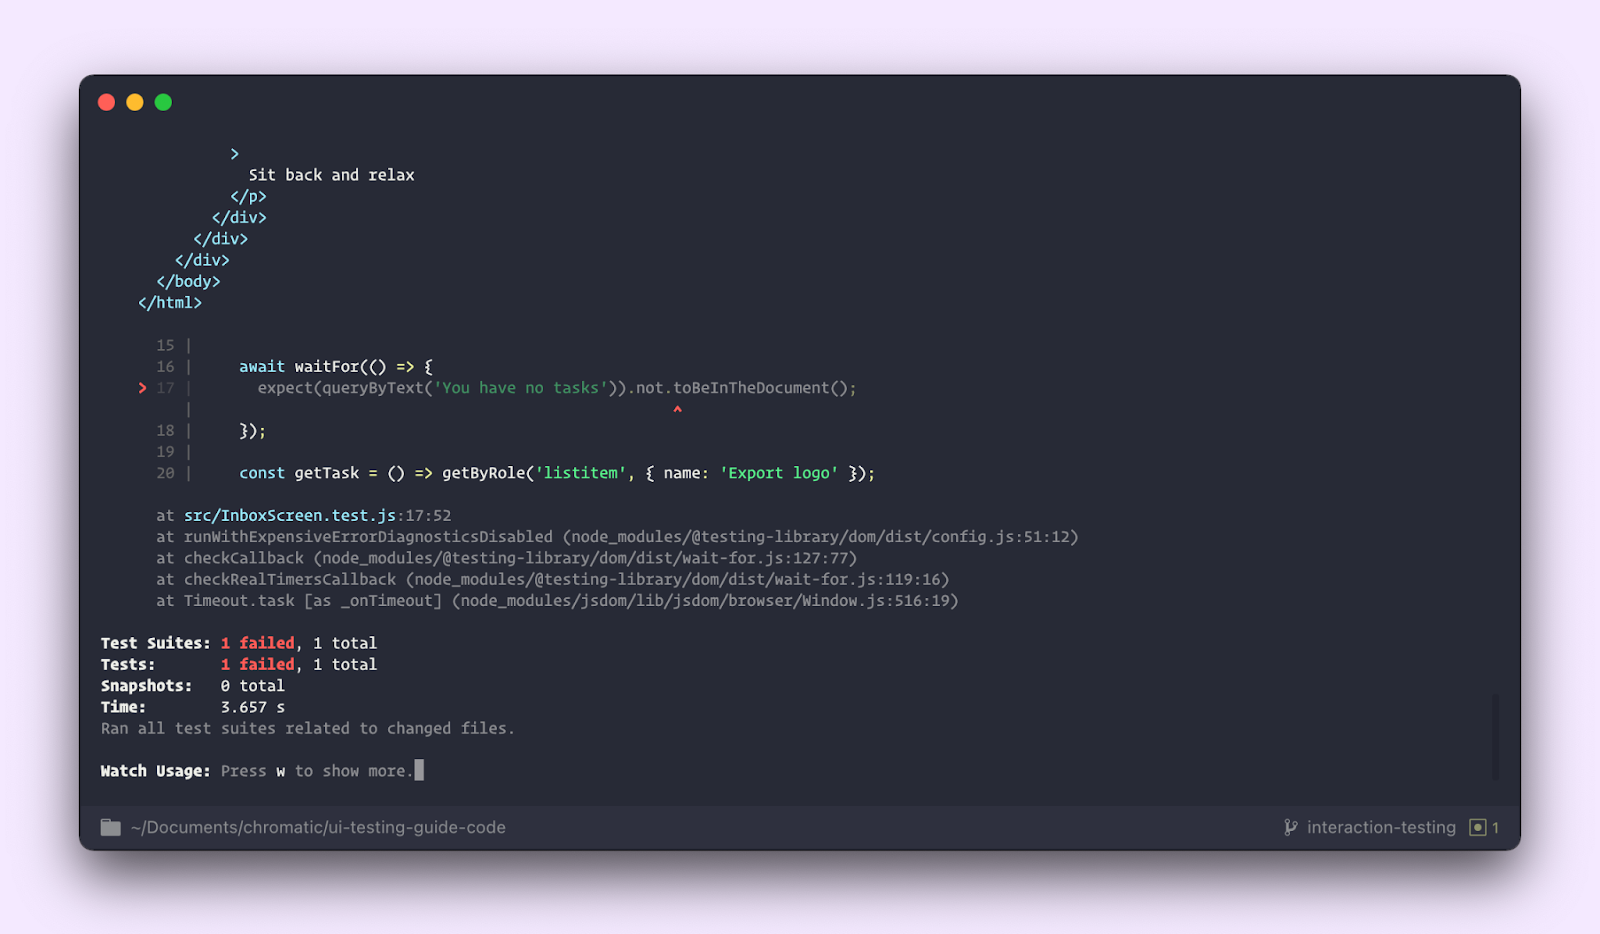
InboxScreen 从后端获取数据。在上一篇文章中,我们设置了Storybook MSW 插件来模拟此 API 请求。但是,Jest 无法使用它。我们需要一种方法来引入这个和其他组件依赖项。
组件配置准备就绪
复杂的组件依赖于外部依赖项,例如主题提供者和用于共享全局数据的上下文。Storybook 使用装饰器来包装 story 并提供此类功能。要导入 stories 及其所有配置,我们将使用@storybook/testing-react 库。
这通常是一个两步过程。首先,我们需要注册所有全局装饰器。在我们的例子中,我们有两个:一个提供 Chakra UI 主题的装饰器和一个用于 MSW 插件的装饰器。之前,我们在.storybook/preview 中配置了这些。
Jest 提供了一个全局设置文件 setupTests.js,该文件由 CRA 在项目引导时自动生成。更新该文件以注册 Storybook 的全局配置。
// setupTests.js
import '@testing-library/jest-dom';
import { setGlobalConfig } from '@storybook/testing-react';
import * as globalStorybookConfig from '../.storybook/preview';
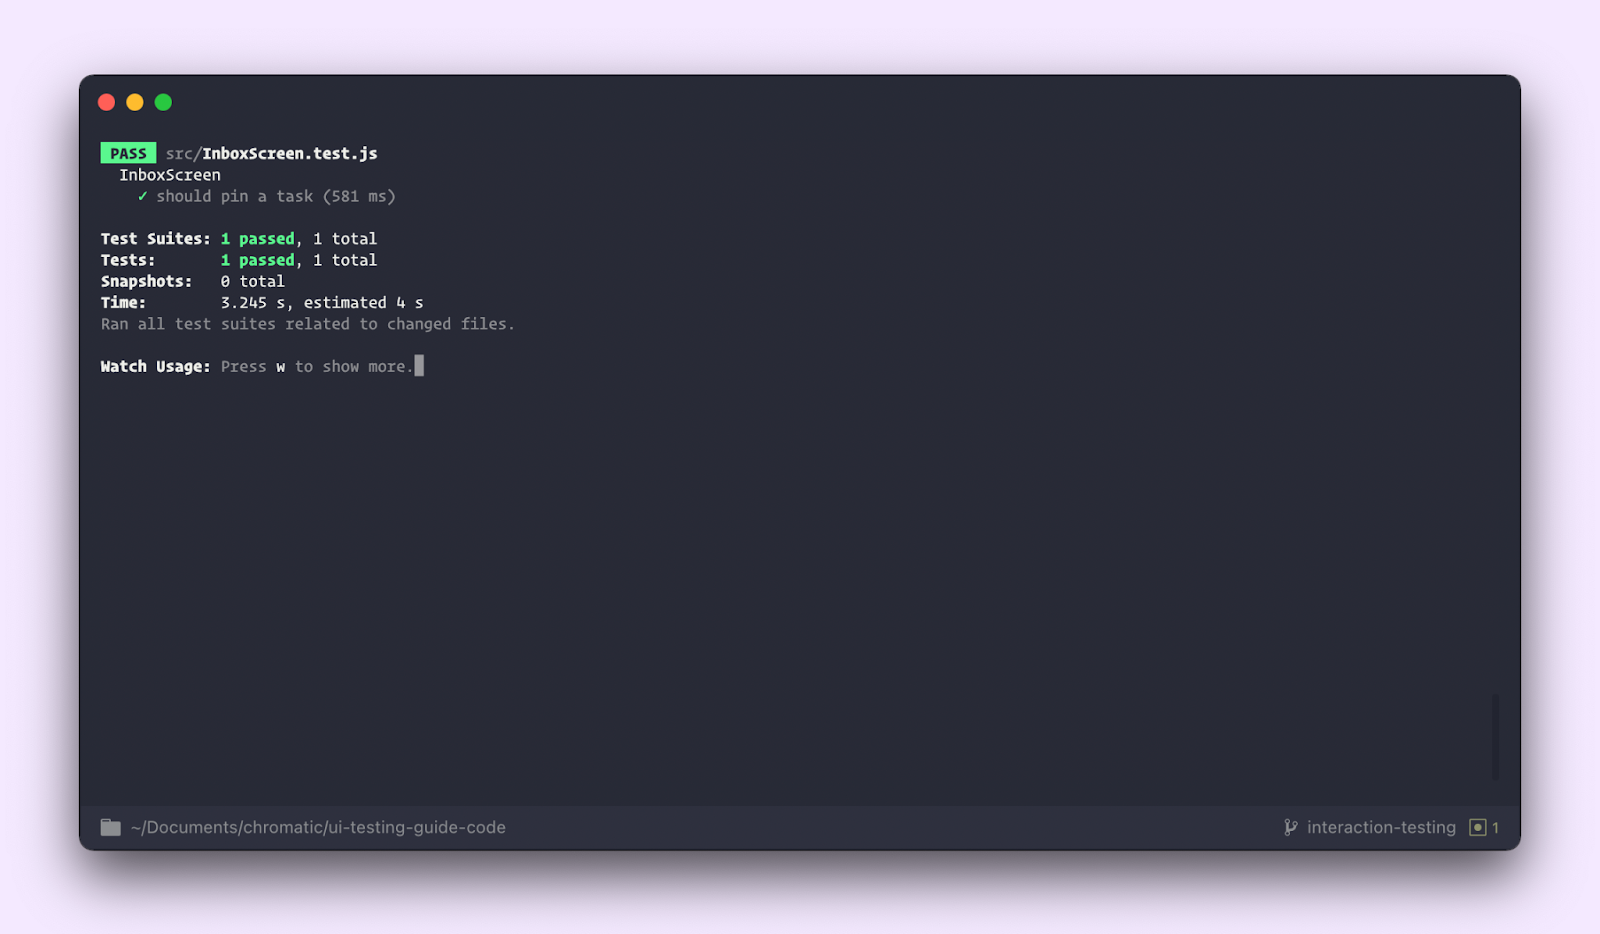
setGlobalConfig(globalStorybookConfig);接下来,更新测试以使用 @storybook/testing-react 中的 composeStories 实用程序。它返回一个 stories 的 1:1 映射,并应用了所有装饰器。就这样,我们的测试通过了!
// InboxScreen.test.js
import React from 'react';
import '@testing-library/jest-dom/extend-expect';
import { render, waitFor, cleanup } from '@testing-library/react';
import { composeStories } from '@storybook/testing-react';
import { getWorker } from 'msw-storybook-addon';
import * as stories from './InboxScreen.stories';

describe('InboxScreen', () => {
 afterEach(() => {
   cleanup();
 });

 // Clean up after all tests are done, preventing this
 // interception layer from affecting irrelevant tests
 afterAll(() => getWorker().close());

 const { Default } = composeStories(stories);

 it('should pin a task', async () => {
   const { queryByText, getByRole } = render(<Default />);

   await waitFor(() => {
     expect(queryByText('You have no tasks')).not.toBeInTheDocument();
   });

   const getTask = () => getByRole('listitem', { name: 'Export logo' });

   const pinButton = within(getTask()).getByRole('button', { name: 'pin' });

   fireEvent.click(pinButton);

   const unpinButton = within(getTask()).getByRole('button', {
     name: 'unpin',
   });

   expect(unpinButton).toBeInTheDocument();
 });
});
我们成功地编写了一个加载 story 并使用 Testing Library 渲染它的测试。然后它应用了模拟的用户行为,并检查组件状态是否被准确更新。
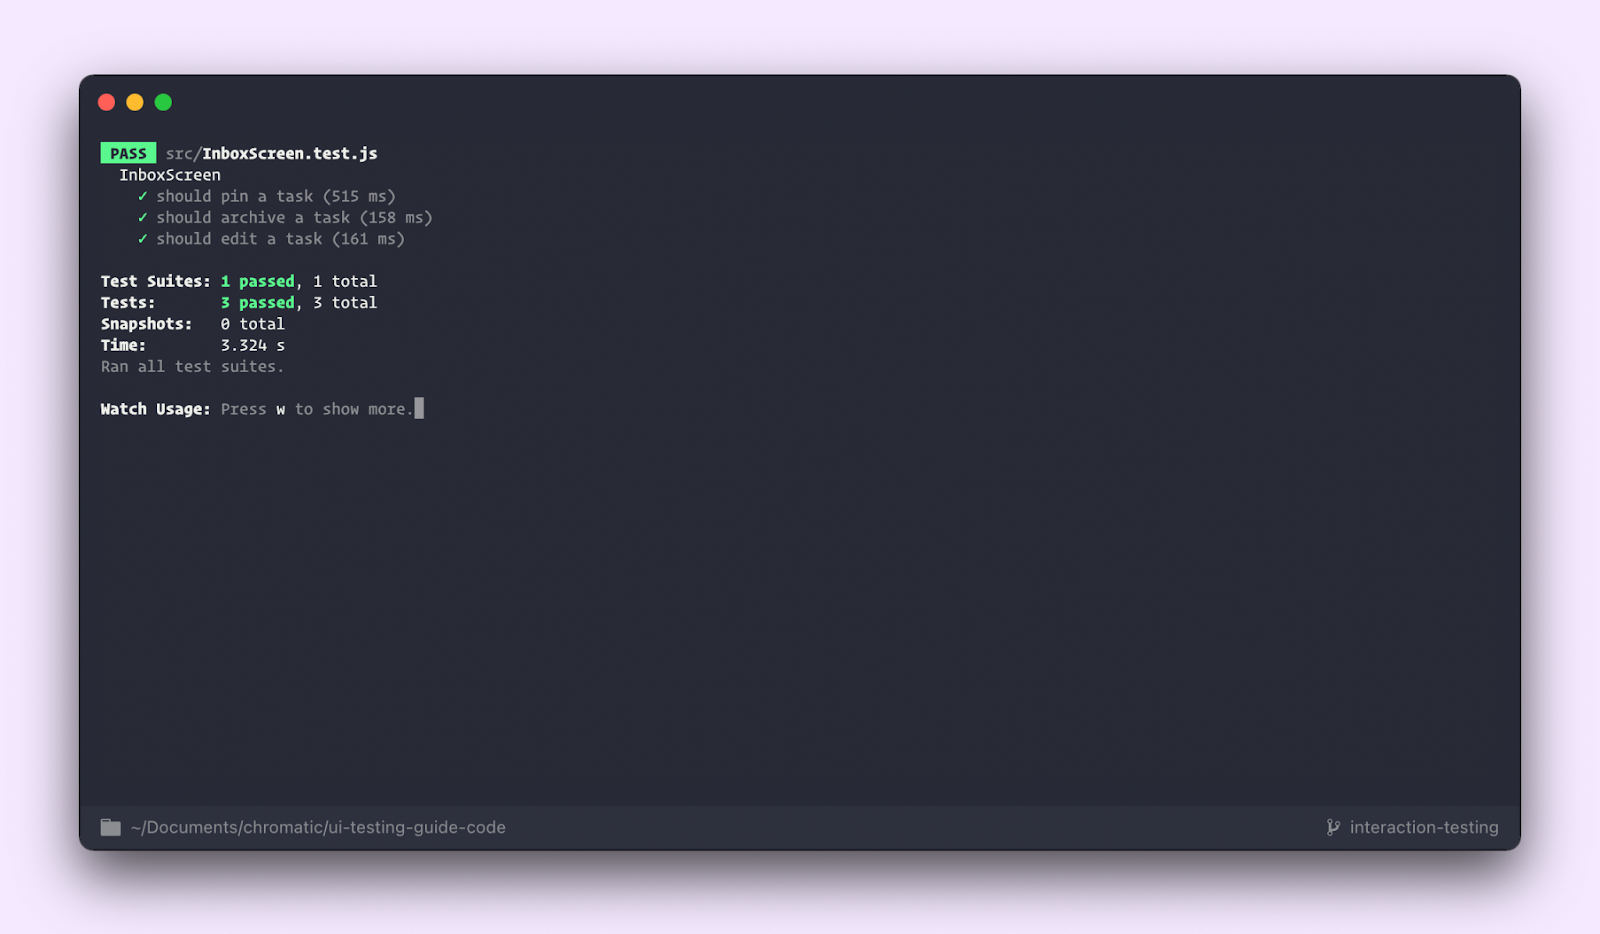
使用相同的模式,我们还可以为存档和编辑场景添加测试。
 it('should archive a task', async () => {
   const { queryByText, getByRole } = render(<Default />);

   await waitFor(() => {
     expect(queryByText('You have no tasks')).not.toBeInTheDocument();
   });

   const task = getByRole('listitem', { name: 'QA dropdown' });
   const archiveCheckbox = within(task).getByRole('checkbox');
   expect(archiveCheckbox.checked).toBe(false);

   fireEvent.click(archiveCheckbox);
   expect(archiveCheckbox.checked).toBe(true);
 });

 it('should edit a task', async () => {
   const { queryByText, getByRole } = render(<Default />);

   await waitFor(() => {
     expect(queryByText('You have no tasks')).not.toBeInTheDocument();
   });

   const task = getByRole('listitem', {
     name: 'Fix bug in input error state',
   });
   const taskInput = within(task).getByRole('textbox');

   const updatedTaskName = 'Fix bug in the textarea error state';

   fireEvent.change(taskInput, {
     target: { value: 'Fix bug in the textarea error state' },
   });
   expect(taskInput.value).toBe(updatedTaskName);
 });
总之,设置代码位于 stories 文件中,而操作和断言位于测试文件中。使用 Testing Library,我们以用户的方式与 UI 交互。将来,如果组件实现发生更改,只有在输出或行为被修改时,测试才会中断。
Stories 是所有类型测试的起点
组件不是静态的。用户可以与 UI 交互并触发状态更新。为了验证这些功能性,你需要编写模拟用户行为的测试。交互测试会检查组件之间的连接,即事件和数据是否在流动。以及底层逻辑是否正确。
将测试用例写成 stories 意味着你只需要进行一次棘手的设置:隔离组件,模拟它们的依赖项,并捕获它们的用例。然后,所有这些设置都可以导入到其他测试框架中,从而为你节省时间和精力。
更重要的是,stories 的可移植性也简化了可访问性测试。当你确保 UI 对所有用户都可用时,你就会影响业务财务并满足法律要求。这是一种双赢。
但可访问性似乎需要大量工作。下一篇文章将介绍如何在开发和 QA 期间自动化可访问性检查。这样你就可以及早发现违规行为,从而节省时间和精力。
你点击购买按钮,但什么也没发生 😰
— Storybook (@storybookjs) 2021 年 7 月 21 日
测试组件功能至关重要但很棘手。你必须模拟用户行为并评估渲染的输出。
这篇文章向你展示了如何使用 @fbjest 和 @TestingLib 来验证用户交互:https://#/CViSSIUwyc pic.twitter.com/jGYsuYkz8e