使用 Storybook 测试组件交互
完整的教程,介绍如何模拟和验证用户行为

组件会获取数据,响应用户交互,并管理应用状态。为了验证这些功能性行为,开发者依赖于自动化测试。但大多数测试工具都基于 Node 和 JSDOM。这意味着你被迫在文本命令行中调试视觉 UI。
在 Storybook,我们正在通过在浏览器中运行测试来改进组件测试。在过去六个月里,我们引入了几项新功能——play 函数、测试运行器、断言库——使之成为现实。本文将引导你完成整个 Storybook 交互测试工作流程。
- 📝 在 stories 文件中编写测试
- 🐛 在浏览器中使用交互面板调试测试
- 🔗 通过 URL 重现错误状态
- 🤖 使用持续集成自动化测试
Storybook 中的组件测试是如何工作的?
测试交互是验证用户行为的一种普遍模式。你提供模拟数据来设置测试场景,使用Testing Library模拟用户交互,然后检查结果 DOM 结构。
在 Storybook 中,这个熟悉的工作流程在你自己的浏览器中发生。这使得调试失败变得更容易,因为你在与开发组件相同的环境中运行测试——即浏览器。
首先,编写一个 story 来设置组件的初始状态。然后,使用 play function 模拟用户行为,如点击和表单输入。最后,使用 Storybook test-runner 检查 UI 和组件状态是否正确更新。通过命令行或 CI 服务器自动化测试。
教程
为了演示测试工作流程,我将使用 Taskbox 应用——一个类似于 Asana 的任务管理应用。在其 InboxScreen 中,用户可以点击星形图标来固定一个任务。或者点击复选框来将其归档。让我们编写测试以确保 UI 对这些交互做出正确响应。
获取代码进行学习
# Clone the template
npx degit chromaui/ui-testing-guide-code#dc9bacae842f5250aad544b139dc9d63a48bbd1e taskbox

cd taskbox

# Install dependencies
yarn
设置测试运行器
我们将从安装 test-runner 和相关包开始(请注意,它需要 Storybook 6.4 或更高版本)。
yarn add -D @storybook/testing-library @storybook/jest @storybook/addon-interactions jest @storybook/test-runner更新你的 Storybook 配置(在 .storybook/main.js 中),以包含 interactions 插件并启用用于调试的 playback controls。
 // .storybook/main.js

module.exports = {
 stories: [],
 addons: [
   // Other Storybook addons
   '@storybook/addon-interactions', // 👈 addon is registered here
 ],
 features: {
   interactionsDebugger: true, // 👈 enable playback controls
 },
};
然后将测试任务添加到你的项目的 package.json 中
{
 "scripts": {
   "test-storybook": "test-storybook"
 }
}
最后,启动你的 Storybook(test-runner 在运行的 Storybook 实例上运行)
yarn storybook编写 stories 来设置测试用例
编写测试的第一步是通过 props 或模拟数据为组件设置场景。这正是 story 的作用,所以让我们为 InboxScreen 组件编写一个。
InboxScreen 通过 /tasks API 请求获取数据,我们将使用MSW 插件对其进行模拟。
// src/InboxScreen.stories.js;

import React from 'react';
import { rest } from 'msw';
import { within, userEvent, findByRole } from '@storybook/testing-library';
import { expect } from '@storybook/jest';
import { InboxScreen } from './InboxScreen';
import { Default as TaskListDefault } from './components/TaskList.stories';

export default {
 component: InboxScreen,
 title: 'InboxScreen',
};

const Template = (args) => <InboxScreen {...args} />;

export const Default = Template.bind({});
Default.parameters = {
 msw: {
   handlers: [
     rest.get('/tasks', (req, res, ctx) => {
       return res(ctx.json(TaskListDefault.args));
     }),
   ],
 },
};
使用 play 函数编写交互测试
Testing Library 提供了一个方便的 API 来模拟用户交互——点击、拖动、点击、输入等。而Jest 提供断言工具。我们将使用这两个工具的 Storybook 包装版本来编写测试。因此,你将获得熟悉的、对开发者友好的语法来与 DOM 交互,但带有额外的遥测数据以帮助调试。
测试本身将包含在一个play function中。这段代码会附加到一个 story 上,并在 story 渲染后运行。
让我们添加第一个交互测试,以验证用户可以固定一个任务
export const PinTask = Template.bind({});
PinTask.parameters = { ...Default.parameters };
PinTask.play = async ({ canvasElement }) => {
  const canvas = within(canvasElement);
  const getTask = (name) => canvas.findByRole('listitem', { name });

  // Find the task to pin
  const itemToPin = await getTask('Export logo');

  // Find the pin button
  const pinButton = await findByRole(itemToPin, 'button', { name: 'pin' });

  // Click the pin button
  await userEvent.click(pinButton);

  // Check that the pin button is now a unpin button
  const unpinButton = within(itemToPin).getByRole('button', { name: 'unpin' });
  await expect(unpinButton).toBeInTheDocument();
};
每个 play function 都会接收 Canvas 元素——story 的顶级容器。你可以将查询范围限制在该元素内,从而更容易找到 DOM 节点。
在我们的例子中,我们正在寻找“Export logo”任务。然后找到它里面的 pin 按钮并点击它。最后,我们检查按钮是否已更新为未固定的状态。
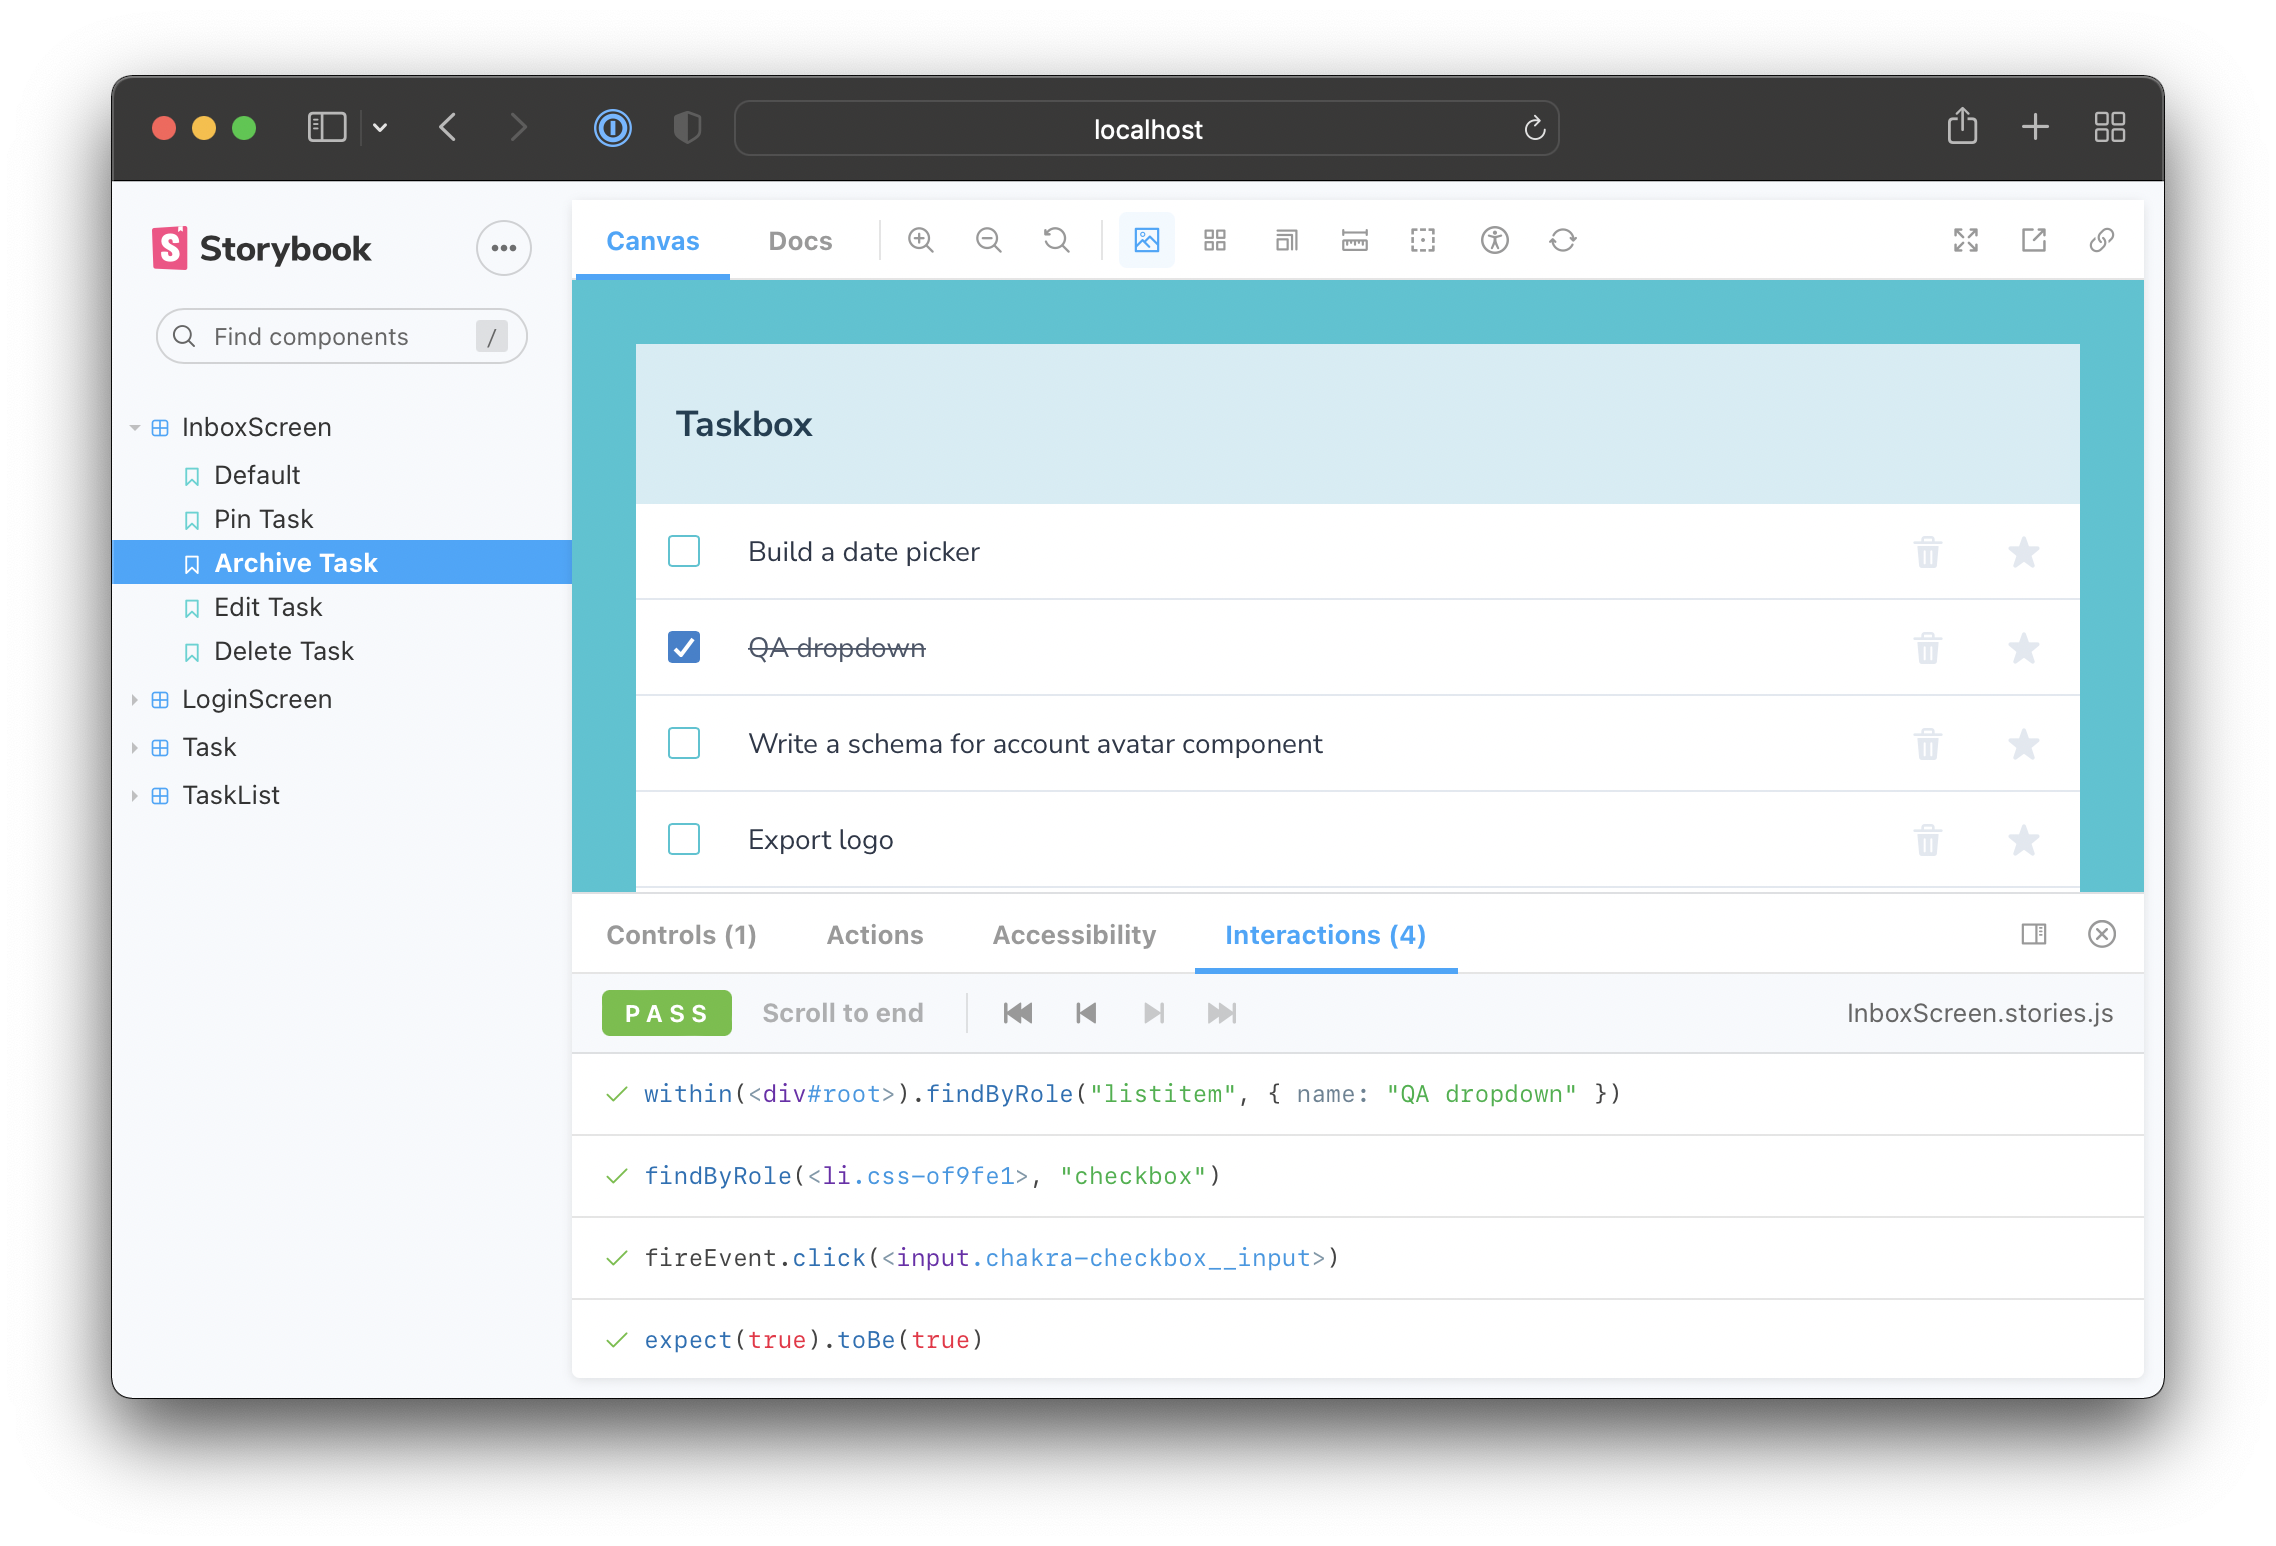
当 Storybook 完成 story 的渲染后,它会执行 play function 中定义的步骤,与组件进行交互并固定一个任务——类似于用户操作的方式。如果你查看你的interactions panel,你会看到逐步的流程。它还提供了一组方便的 UI 控件来暂停、恢复、倒带和逐个交互。
使用 test-runner 执行测试
现在我们已经完成了第一个测试,我们还将添加 archive、edit 和 delete 任务功能的测试。
export const ArchiveTask = Template.bind({});
ArchiveTask.parameters = { ...Default.parameters };
ArchiveTask.play = async ({ canvasElement }) => {
  const canvas = within(canvasElement);
  const getTask = (name) => canvas.findByRole('listitem', { name });

  const itemToArchive = await getTask('QA dropdown');
  const archiveCheckbox = await findByRole(itemToArchive, 'checkbox');
  await userEvent.click(archiveCheckbox);

  await expect(archiveCheckbox.checked).toBe(true);
};

export const EditTask = Template.bind({});
EditTask.parameters = { ...Default.parameters };
EditTask.play = async ({ canvasElement }) => {
  const canvas = within(canvasElement);
  const getTask = (name) => canvas.findByRole('listitem', { name });

  const itemToEdit = await getTask('Fix bug in input error state');
  const taskInput = await findByRole(itemToEdit, 'textbox');

  userEvent.type(taskInput, ' and disabled state');
  await expect(taskInput.value).toBe(
    'Fix bug in input error state and disabled state'
  );
};

export const DeleteTask = Template.bind({});
DeleteTask.parameters = { ...Default.parameters };
DeleteTask.play = async ({ canvasElement }) => {
  const canvas = within(canvasElement);
  const getTask = (name) => canvas.findByRole('listitem', { name });

  const itemToDelete = await getTask('Build a date picker');
  const deleteButton = await findByRole(itemToDelete, 'button', {
    name: 'delete',
  });
  await userEvent.click(deleteButton);

  expect(canvas.getAllByRole('listitem').length).toBe(5);
};
现在你应该可以看到这些场景的 stories。Storybook 只在你查看 story 时运行交互测试。因此,你必须逐个查看每个 story 来运行所有检查。
手动审查整个 Storybook 是不现实的,每次你做出更改。Storybook test-runner 会自动执行此过程。它是一个独立的实用工具——由Playwright驱动——它运行你所有的交互测试并捕获损坏的 stories。
在单独的终端窗口中启动 test-runner:yarn test-storybook --watch。它会验证所有 stories 是否渲染没有错误,并且所有断言都通过了。
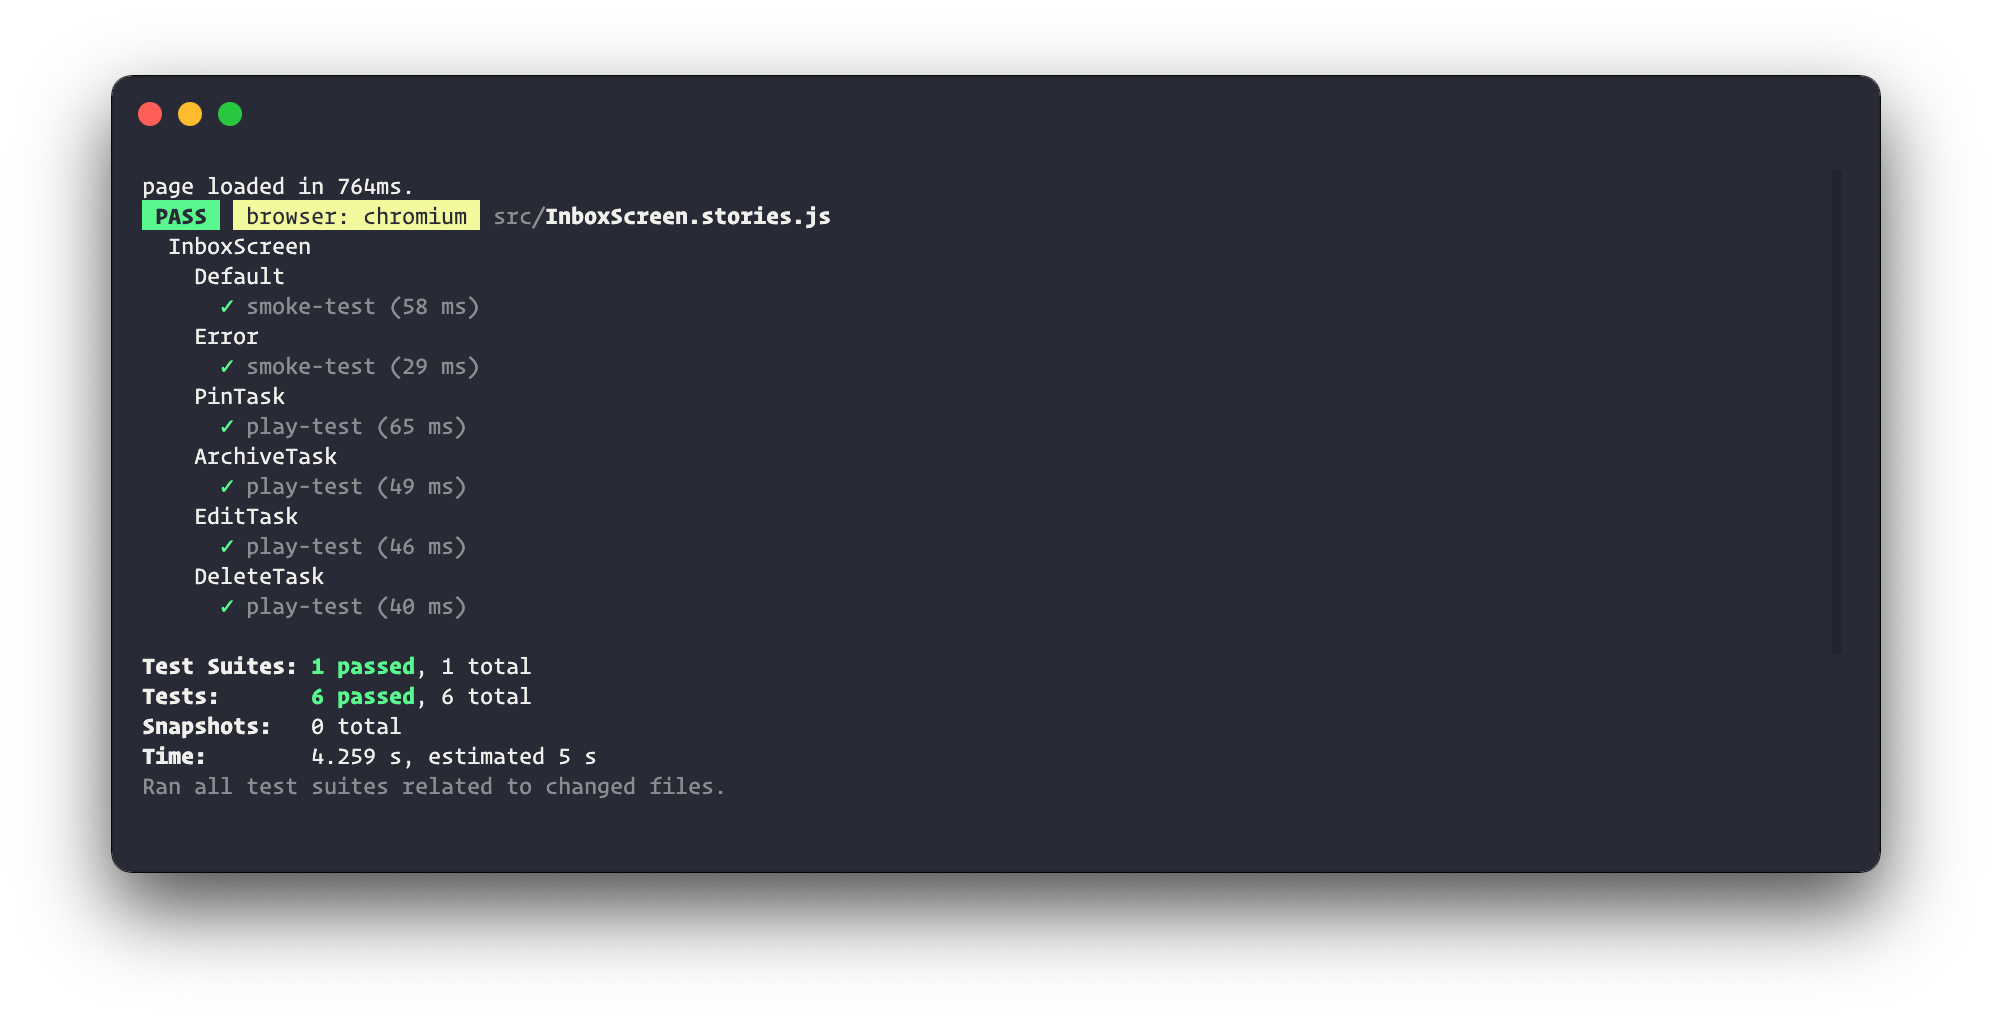
如果测试失败,你会得到一个链接,该链接会在浏览器中打开失败的 story。
你已经解决了本地开发工作流程。Storybook 和 test-runner 并行运行,允许你单独构建组件并一次性测试其底层逻辑。
自动化 Storybook 交互测试
一旦你准备好合并代码,你就会想使用持续集成(CI)服务器来自动运行所有检查。你有两种选择可以将 Storybook 交互测试集成到你的测试自动化流水线中:在 CI 中使用 test-runner,或将其与 Chromatic 的视觉测试结合。
在 CI 中运行 test-runner
你可以在 CI 服务器上构建和提供 Storybook,然后对其运行 test-runner。这是一个使用concurrently、http-server和wait-on库的配方。
# .github/workflows/ui-tests.yml

name: 'Storybook Tests'
on: push
jobs:
 test:
   timeout-minutes: 60
   runs-on: ubuntu-latest
   steps:
     - uses: actions/checkout@v2
     - uses: actions/setup-node@v2
       with:
         node-version: '14.x'
     - name: Install dependencies
       run: yarn
     - name: Install Playwright
       run: npx playwright install --with-deps
     - name: Build Storybook
       run: yarn build-storybook --quiet
     - name: Serve Storybook and run tests
       run: |
         npx concurrently -k -s first -n "SB,TEST" -c "magenta,blue" \
           "npx http-server storybook-static --port 6006 --silent" \
           "npx wait-on tcp:6006 && yarn test-storybook"
你也可以运行针对已发布 Storybook 的测试。有关更多信息以及其他 CI 配置选项,请参阅test-runner 文档。
使用 Chromatic 结合交互测试和视觉测试
捕获意外的 UI 更改一直是一个挑战。一行有问题的 CSS 可能会破坏多个页面。这就是为什么 Auth0、Twilio、Adobe 和 Peloton 的领先团队依赖视觉测试。Chromatic是一个专为 Storybook 构建的云端视觉测试工具。它也可以执行你的交互测试。
Chromatic 的工作原理是捕获浏览器中每个 story 的图像快照。然后,当你打开一个 pull request 时,它会将其与先前接受的基线进行比较,并显示一个 diff。
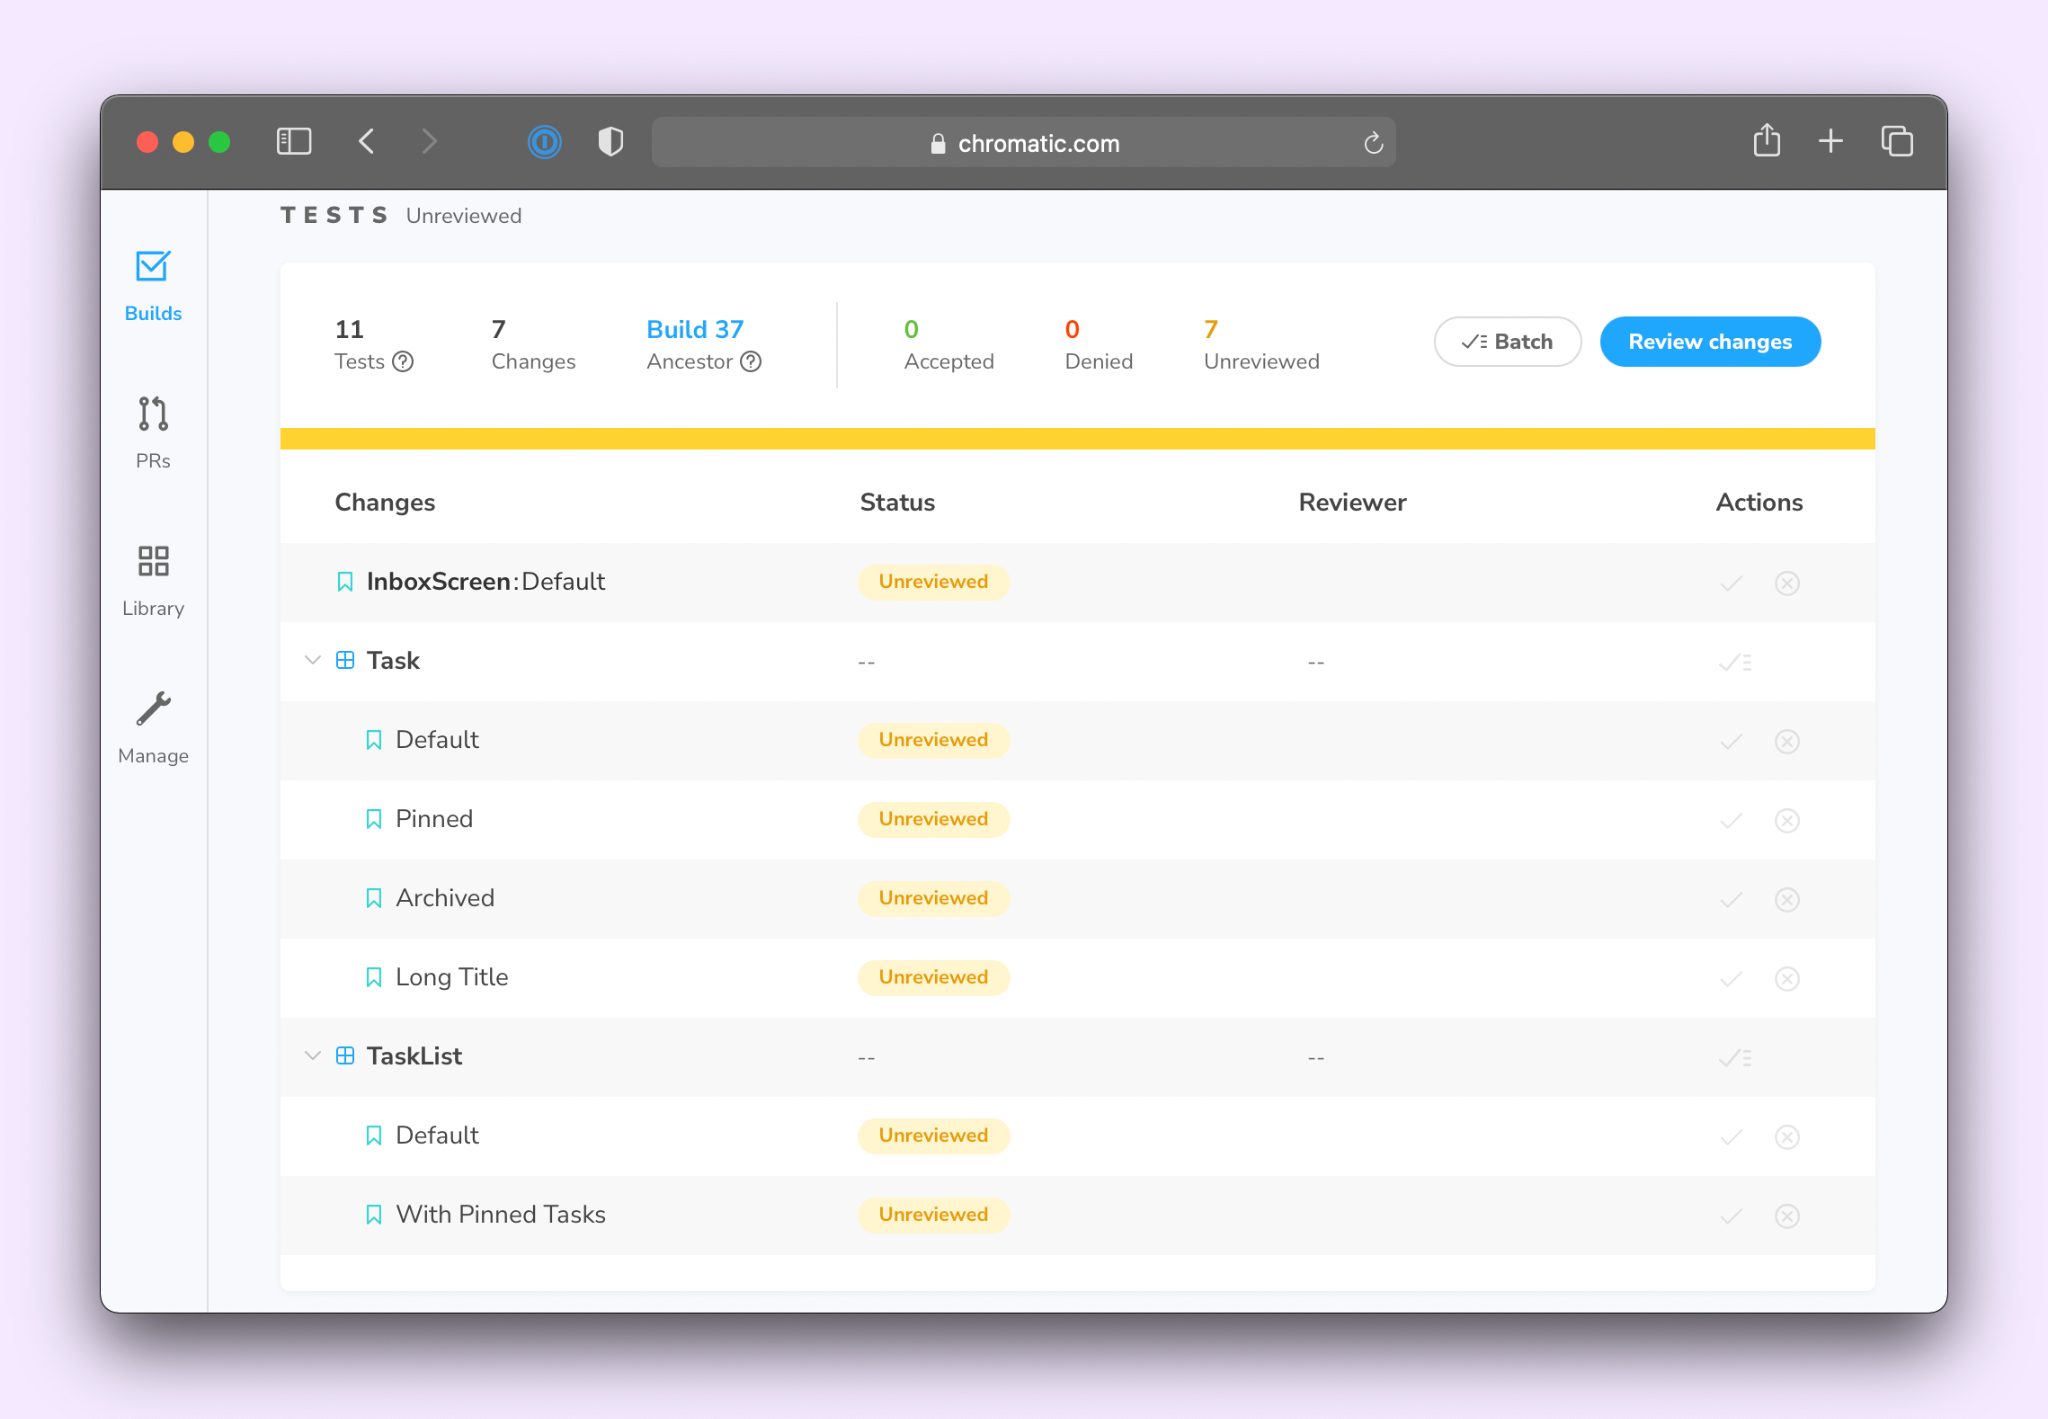
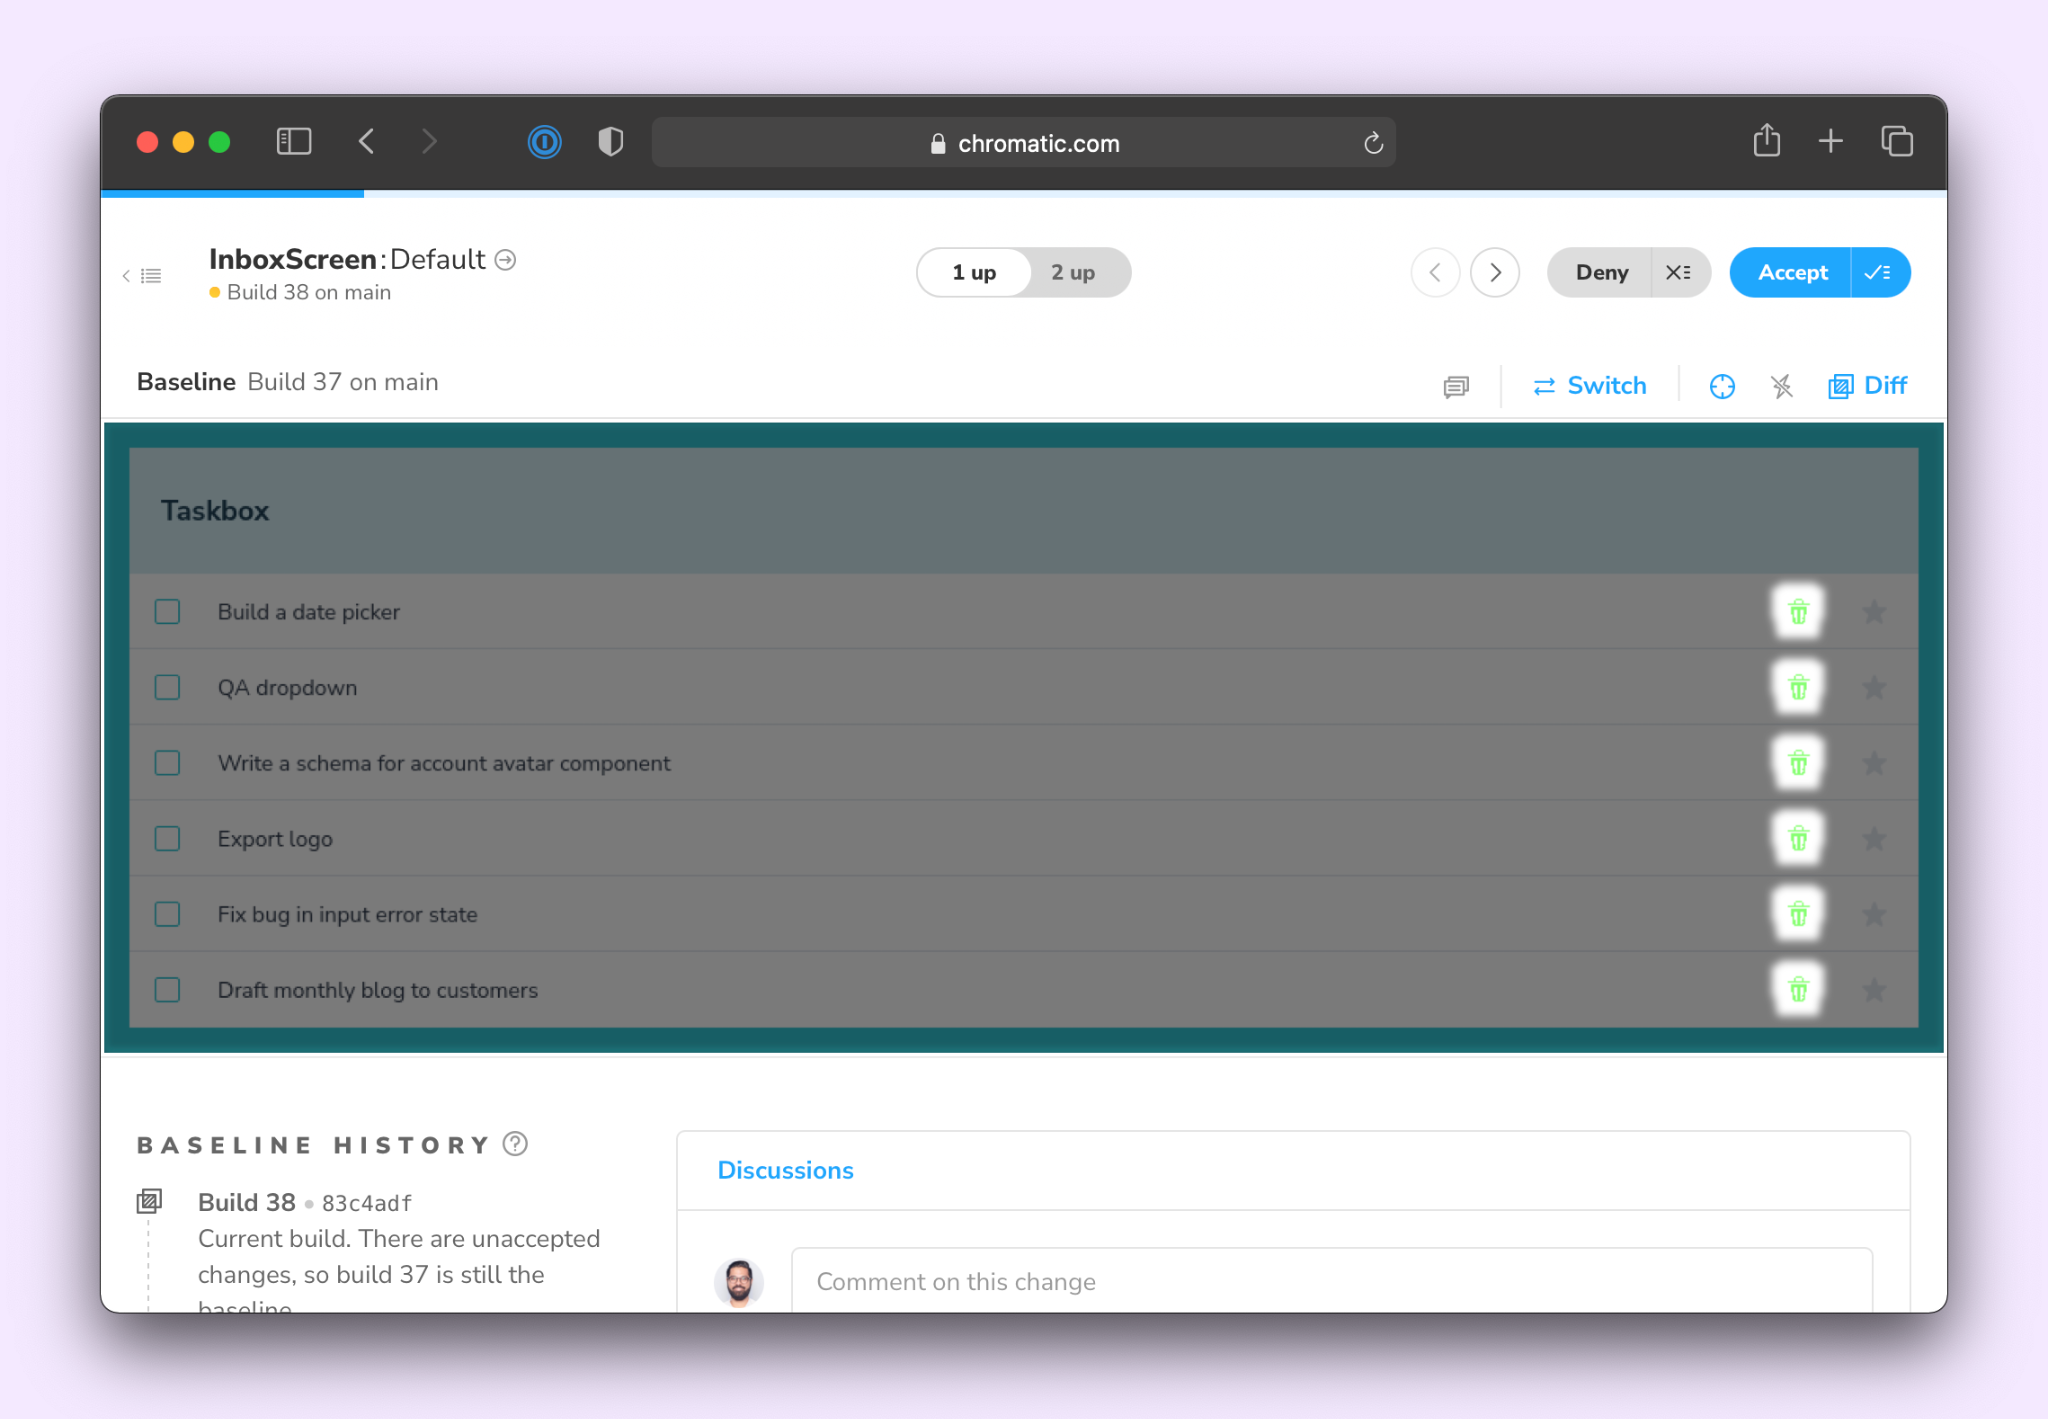
Chromatic 开箱即用支持 Storybook 交互测试。它会在捕获快照之前等待交互测试运行。这样,你就可以一次性验证组件的视觉外观和底层逻辑。任何测试失败都会通过 Chromatic UI 报告。
以下是一个使用 Github Actions 运行 Chromatic 的示例工作流程。对于其他 CI 服务,请参阅Chromatic 文档。
# .github/workflows/ui-tests.yml

name: 'Chromatic'
on: push
jobs:
 chromatic-deployment:
   runs-on: ubuntu-latest
   steps:
     - uses: actions/checkout@v2
       with:
         fetch-depth: 0 # Required to retrieve git history
     - name: Install dependencies
       run: yarn
     - name: Publish to Chromatic
       uses: chromaui/action@v1
       with:
         # Grab this from the Chromatic manage page
         projectToken: ${{ secrets.CHROMATIC_PROJECT_TOKEN }}
在浏览器中使用 Storybook 测试组件
组件不是静态的。用户可以与 UI 交互并触发状态更新。你必须编写模拟用户行为的测试来验证这些行为。
Storybook 交互测试是我们对组件测试的愿景:快速、直观,并与你已使用的工具集成。它将实时浏览器的直观调试环境与无头浏览器的性能和脚本化能力相结合。
如果你一直在跟随代码,你的存储库应该看起来像这样:GitHub 存储库。
想要更多?这里有一些额外的有用资源
- Storybook 交互测试文档
- 测试运行器文档
- 交互面板文档
- UI 测试手册,深入了解 UI 测试
组件管理状态并响应用户交互。
— Storybook (@storybookjs) 2022年4月6日
你可以使用 Storybook 测试此行为
📝 将初始状态设置为 story
🐙 使用 play function 模拟事件
✅ 使用 test-runner 断言 DOM 结构
从我们的新教程开始:https://#/fOwVOHMHQS pic.twitter.com/vcm5C4fsTL